Showing posts with label Candy. Show all posts

Thursday, March 19, 2009

Chocolate Mint Paddies


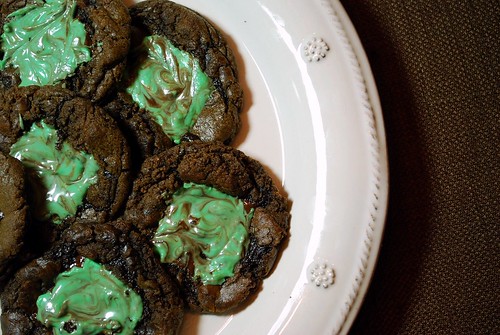
These are the perfect chocolate cookies, made only better by the molten chocolate mint candies that nest in the center of them. I am so glad that a friend recommended this recipe to me. You can tell just by reading it that it is a true retro recipe!

These chocolate cookies are chewy, with just a slight crunch around the edge. The texture is perfectly satisfying - chewy and gooey - and the mint centers melt in your mouth to make the perfectly decadent dessert after a weeknight meal. Their colorful swirls were a match made in heaven for our St. Patrick's Day feast this week.


Chocolate Mint Paddies

Adapted from AllRecipes.com

3/4 cup butter
1/2 cup brown sugar
1 cup sugar
2 tablespoons molasses
2 tablespoons water
2 cups semisweet chocolate chips
1 teaspoon vanilla
2 eggs
2 1/2 cups flour
1 1/4 teaspoons baking soda
1/2 teaspoon salt
36 chocolate covered mint candies (i.e. Andes Mints)

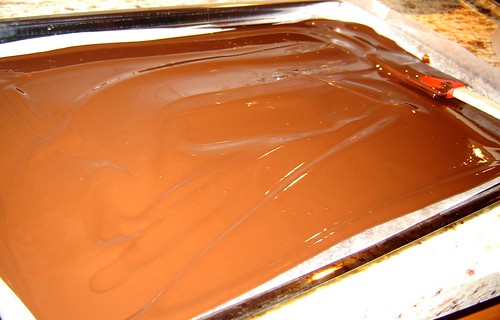
In a heavy saucepan, heat the butter, the sugars, the molasses, and the water until melted and completely combined. Remove from the heat, and pour in the chocolate chips, stirring until melted and incorporated. Set the mixture aside to cool for about 15 minutes.

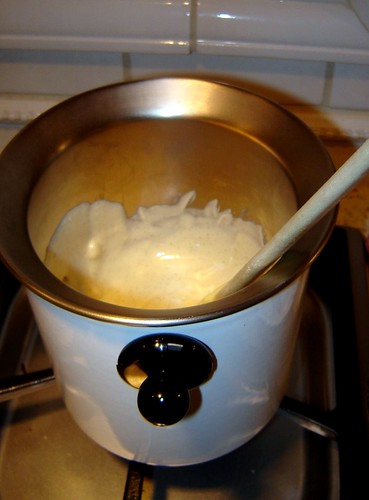
Next, beat in the eggs, one at a time with the vanilla. In a seperate bowl, whisk together the dry ingredients. Gradually add the dry ingredients to the chocolate mixture, stirring until completely incorporated. Cover and chill the dough for at least one hour.

Preheat your oven to 350 degrees and grease 2 large cookie sheets. Roll the chilled dough into walnut-sized balls, and place them about 2 inches apart on the prepared cookie sheets.

Bake the cookies for about 8-10 minutes. Remove from the oven and press a chocolate-covered mint candy into the center of each cookie. Allow the candies to melt for about 1 minute. Then, using a toothpick, swirl the mint portion of the candy in a decorative fashion. Remove the cookies to racks to cool completely. Yield 3-4 dozen cookies. Enjoy!

Tuesday, December 30, 2008

Oreo Truffles with a Peppermint Twist


So I've been hearing so much buzz about how amazing oreo truffles are - I thought I'd try them, but with a peppermint twist. Instead of using Oreos, I used Trader Joe's Candy Cane Joe-Joe cookies. They are basically just like oreos, with a peppermint-cream filling.

Oreo Truffles with a Peppermint Twist
Adapted from Beantown Baker's recipe

24 peppermint oreo cookies
1/2 cup (4 oz.) sweetened condensed milk
1 teaspoon vanilla extract
1/4 teaspoon peppermint extract
8 ounces bittersweet chocolate
1 teaspoon canola oil
3 peppermint candy canes, crushed into small pieces

Line a cookie sheet with aluminum foil or wax paper and clear some space in your fridge.

Crush cookies using a food processor or a blender. The cookies should be crumbly, but not totally pulverized.

In a measuring cup, combine condensed milk, vanilla, and peppermint extract, stirring until incorporated. Pour this mixture over the crushed Oreos, and stir until ingredients come together. Working quickly, form the mixture into 1" balls by rolling between your hands, and place them on cookie sheet. Even if the mimxture feels sticky at first, it will roll into balls well if you use your palms. Put the balls into refrigerator to chill (for easy dipping).
Sidenote: at this point in the process, my cute hubby says, "I don't know WHAT to caal THOSE balls . . ." - in reference to his funny name for Hayley's Nutella Cookies that I make.

Melt the chocolate using your favorite method. I like to use my double boiler, but you can use your microwave in 10-15 second increments as well.

Dip chocolate balls into melted chocolate and put back on cookie sheet.

Sprinkle with crushed peppermint, and return to fridge until chocolate hardens.

Then I placed ours in mini-cupcake liners for no-mess scarfing.

We took a tin of these with us on our trip to the mountains for New Year's Eve and they were a BIG hit! There were only 4 of us, and we polished this batch off with ease. Oops! Guess it's time for New Year's Resolutions . . .

Thursday, December 18, 2008

Marvelous Marbled Peppermint Bark


What could be more festive and full of holiday cheer than
beautifully swirled peppermint bark!?!


When I was in 6th grade, I did my science fair project on the science behind the art of paper marbling. It involved chaos theory, density of liquids, and a lot of other super nerdy stuff. It was so much fun! There are lots of different techniques and tools that you can use to create different patterns. Here is what paper marbling looks like:


Well, I had a flashback to that science fair project last night when my mom and I made some Marvelous Marbled Peppermint Bark. This was so much fun to make, and it turned out looking so beautiful. Most importantly, it is a delicious little holiday treat. And it was super easy and quick - the directions are just a little long here because I got so picture-happy!


Marvelous Marbled Peppermint Bark

10.5 ounces high-quality dark chocolate, finely chopped or grated
(I used Lindt Excellence 70% cocoa intense dark chocolate)
3 ounces high-quality white chocolate , finely chopped or grated
(I used Ghirardelli Sublime White Vanilla Dream squares)
4 candy canes or equivalent peppermint candies

Line a baking sheet with wax paper and set aside. Place the candy canes in a plastic bag, seal, and whack with something really hard, like a meat pounder, until they are crushed into small pieces.

Heat dark chocolate in a double boiler. I have a fancy one that my mom gave me (it even makes a little train whistle sound!), but you can also use a pot of simmering water with a glass bowl that fits over the top. Just make sure that the water doesn't touch the bottom of the bowl. When chocolate is completely melted, spread it evenly over the prepared paper-lined pan.


In a clean and dry double boiler, melt the white chocolate until smooth.


Spoon the melted white chocolate over the dark chocolate. Then, drag the tip of a toothpick through the chocolate, snaking back and forth from the left side of the pan to the right side of the pan. Next, drag the tip of a toothpick, snaking back and forth from the far side of the pan to the near side of the pan. The resulting pattern will look pretty and marbled! Sprinkle the pieces of candy cane over the top, and push them lightly into the chocolate.


You can also swirl the chocolates in a random pattern, as I did with this batch. Either way ends up looking beautiful.


Place the tray of candy flat in the freezer for about 15-20 minutes, until very firm. Break into randomly-shaped pieces with your hands and enjoy! Keeps well in an air-tight container in the fridge for several days - if you can wait to eat it for that long!


I just love how it looks packed up in this Santa tin! This is the batch I made for my mom.


I also packaged a second batch for my co-workers as a little Christmas treat on our last day together before the holidays. They turned out pretty cute!


Sorry, I had waaayyy too much fun with the photos on this one!!!

Sunday, December 7, 2008

Turtle Pretzel Candies


I adapted this recipe from one that I found on Allrecipes.com - one of my favorite websites because I love to read people's reviews of different recipes! It's been a much-loved treat in my family and my husbands family ever since I discovered it.

These candies are SUPER easy to make and taste amazing with the combination of salty, sweet, and chocolate all melding together in one scrumptious bite.
You can use regular raw halved pecans, roasted pecans, or roasted and salted pecans in this candy. I usually roast and salt some raw pecan halves that I get from a local place here in Georgia.

Roasted Salted Pecans

2 cups pecan halves
1 tablespoon unsalted butter, melted
1 teaspoon sea salt

Preheat oven to 300 degrees. Combine all ingredients in a medium bowl and toss until pecans are evenly coated with butter and salt. Arrange mixture evenly on large baking sheet and put in the oven. Cook for 20 minutes, or until nuts are fragrant and just starting to brown, stirring about every 4-5 minutes. Cool the nuts and enjoy or add to your favorite recipe.


Turtle Pretzel Candies
1 large bag of bite-sized pretzels (I use Snyder's "Pounder" bag of rectangle-shaped pretzels)
2 bags Caramel-Filled Milk Chocolates (I use Dove - the best!)
2 cups roasted salted pecans (see recipe above)

Preheat oven to 250 degrees. On a large cookie sheet, line up pretzels and top each with one caramel-filled chocolate. Put in the oven for about 5 minutes, or until chocolate is shiny and beginning to melt on the outside. Remove from the oven. Top each pretzel/chocolate with one halved pecan, pushing down lightly so that pecan adheres to chocolate, and chocolate adheres to pretzel. Allow candies to cool completely, and enjoy! Makes about 60 candies.


Thursday, December 4, 2008

Creamy Chocolate-Almond Fudge


This is the most balanced, easy-to-eat fudge recipe I've ever made. The perfect amount of sweetness, creaminess, crunchy nuts, and chocolate decadance. It was a big hit at our Christmas party!

Creamy Chocolate-Almond Fudge

1 7-ounce jar of marshmallow cream
1 cup white sugar
2/3 cup evaporated milk
1/4 cup butter
1/4 teaspoon salt
1 cup milk chocolate chips
2 cups semisweet chocolate chips
1 cup chopped roasted almonds
1 teaspoon vanilla extract

Line an 8 x 8" pan with aluminum foil. Spray lightly with Pam and set aside.

In a large saucepan over medium heat, combine marshmallow cream, sugar, evaporated milk, butter and salt. Bring to a full rolling boil and cook for 5 minutes, stirring constantly. Mixture will thicken slightly and turn a light caramel color.

Remove mixture from heat and add chocolate chips. Stir until all chocolate is melted and mixture is smooth. Stir in nuts and vanilla.

Pour into prepared pan and smooth top with spatula. Chill in refrigerator for 2 hours or until firm. Slice into pieces and enjoy!


Here is the fudge setting in the fridge:


And here it is sliced into bite-sized pieces!
This recipe keeps fresh for several days in an airtight container, making it great for shipping in care packages or for making ahead of time for parties or gifts!


Made by Lena