Saturday, February 28, 2009

Ma! Meatloaf!!


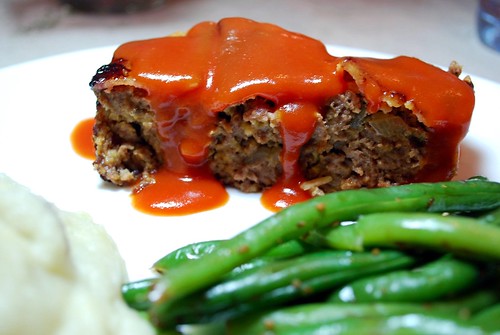
Just like with chili, my mom makes the absolute best meatloaf. There is nothing more comforting and homey than a nice juicy, tender slice with mashed potatoes and green beans on the side.

Here, I take my mom's meatloaf, and I do it my way. Basically, this means adding some bacon and some herbs - but the base is the same recipe as my mom's. This meatloaf is unbelievably flavorful. The smoky, salty bacon basically marinates the meat as it cooks, keeping it moist and delicious. The easy tomato sauce on top completes this perfectly cozy dish.


Ma's Meatloaf, My Way


1-1.5 lbs. lean ground beef
1 egg, lightly beaten
1/3 cup fresh breadcrumbs (I just grate up a white hamburger bun)
1 large clove of garlic, finely minced
1/4 cup onion, finely chopped
1 teaspoon salt
1 teaspoon black pepper
1/4 teaspoon dried sage
1/4 teaspoon dried parsley
3 tablespoons ketchup
1 tablespoon Worcestershire sauce
A dash Montreal steak seasoning
3 slices of thick-sliced center-cut bacon
1 can condensed tomato soup (recommended: Campbell's)

Preheat oven to 375 degrees. Grease a standard loaf pan with cooking spray and set aside.

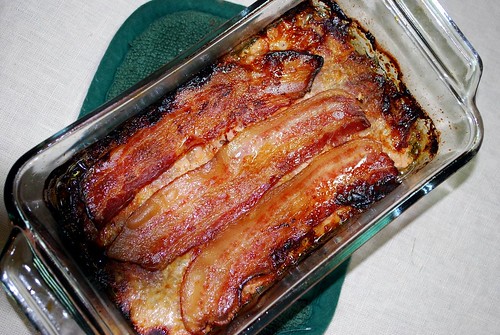
In a large bowl, mix together the meat, egg, breadcrumbs, garlic, onion, salt, pepper, sage, parsley, ketchup, Worcestershire, and steak seasoning - lightly, using a fork or your hands. When it is fully combined, turn the meat mixture into the prepared loaf pan, and pat lightly into the form of a loaf. Top with the three slices of bacon. Bake for about 45 minutes to an hour, or until meat is cooked all the way through the loaf.


Meanwhile, heat the tomato soup in a small saucepan over medium heat. Slice the meatloaf and spoon the hot tomato soup over the top.

This meatloaf only gets better with age. Try slicing your leftovers and making a hearty sandwich with white bread and ketchup - divine!

Hummus My Favorite Tune


Hummus is a favorite snack in our household, and I've been wanting to try making my own hummus for a while now. I've heard that not only is it cheaper to make it yourself, but it's also much more delicious to make it from scratch. I am one vintage lady who loves to make things from scratch on the cheap, so I was excited to try this out!

I got this basic hummus recipe from a fellow food blogger - Katie from Good Things Catered. You should definitely check out her blog for lots of fabulous recipes and tips.


Hummus

From Katie of Good Things Catered

1 12-ounce can of chick peas (also called garbanzo beans)
1-2 large cloves of garlic
2 tablespoons extra virgin olive oil
2 teaspoons tahini (sesame paste)
1 lemon, juiced
1/4 teaspoon salt

Drain chick peas, reserving their water/juice in a small bowl. In a food processor (or blender), mix together the chick peas with the rest of the ingredients, being careful to add second half of lemon juice and tahini slowly, stopping to taste. Slowly add some of the reserved liquid from beans and a bit of water for correct consistency. Process for about 1-2 minutes until a smooth paste is formed. Refrigerate for at least 30 minutes before serving. This changes the taste of the hummus by allowing the flavors to form.

To dress the hummus up for the table, the traditional way of serving is on a plate, with an extra drizzle of olive oil on top and a sprinkle of paprika and chopped parsley. Serve with warm pita bread or pita chips, and fresh veggies like sliced cucumber, baby carrots, or grape tomatoes.

Enjoy!

Thursday, February 26, 2009

Ash Wednesday Dinner


Since I did a sinfully delicious post on our Mardi Gras dinner, I figured I should also post our meat-free Ash Wednesday dinner as well: Pan-Fried Tilapia! It's definitely a stand-by dinner in my family for a quick, delicious, and healthy meal. Here's how I like to prepare it.

Pan-Fried Tilapia

2 tablespoons olive oil
4 tilapia fillets
1/2 cup flour
1-2 egg(s)
1/2 cup buttermilk
1 cup panko bread crumbs
salt and pepper to taste
other seasoning of your choice, if desired

Measure your olive oil into a large frying pan and warm it up over medium heat.

Meanwhile, measure flour into a shallow dish. Season generously with salt and pepper. Crack eggs and measure buttermilk into a second shallow dish, mixing lightly with a fork. Measure panko bread crumbs into a third shallow dish, seasoning generously with salt, pepper, and whatever other seasonings you like (garlic, herbes de provence, greek seasoning, cajun seasoning, lemon pepper - the possibilities are endless!).

Take one tilapia fillet. Coat it first in the flour mixture. Next, dip it in the egg mixture, coating on both sides. Finally, dip it into the seasoned panko bread crumbs to coat completely. Drop the tilapia in your preheated pan. Repeat with remaining tilapia fillets.

Cook for about 4 minutes per side (depending on the thickness of your fillets). You will know that your fish is done when it flakes when tested with a fork. Serve immediately with potatoes, grits, your favorite veggies, or a nice green salad.


I apologize for the lame-o cell phone pics, but as some of you know my life is a bit crazy and I don't always have my wonderful new camera with me, depending on where I happen to find myself at dinnertime!

Wednesday, February 25, 2009

Mardi Gras with Danish Ebelskivers


So: Ebelskiver. Say it with me: "able-skeever" - yes!

These delightful little pastries are actually spherical Danish pancakes that have a filling in the middle. Ebelskiver means "apple slices" in Danish, and you will sometimes see it spelled "aebelskiver." As you might have guessed, apples are one of the traditional fillings that you will find inside an ebelskiver.

How do you make these little puffs of joy? With an Ebelskiver Pan, which can be found at most cooking stores. I received mine as a gift last year from my sweet sister-in-law, who is also an excellent chef! Here is what it looks like:


A quality that I absolutely love in a dish is when you can make it savory OR sweet. And ebelskiver definitely fit the bill on this one. You can fill them with savory fillings like swiss cheese and ham or cheddar and bacon, or you can fill them with sweet fillings like fruit or chocolate. Here is a list of great fillings that we have tried:

Savory Fillings
  • grated swiss cheese and diced ham
  • grated cheddar cheese with diced bacon
  • your favorite shredded cheese
  • cream cheese or laughing cow cheese
  • herbed goat cheese


Sweet Fillings
  • home-made stewed applesauce
  • pecans, walnuts, hazelnuts, almonds
  • raspberry preserves
  • chocolate chips
  • fresh blueberries
  • raspberry preserves and chocolate chips
  • nutella

This sweet-or-savory combination made them perfect for dinner on fat tuesday. We always have a traditional meal of pancakes for dinner on Mardi Gras, and what could be better than savory filled pancakes for dinner with sweet filled pancakes for dessert???

Danish Ebelskiver

Adapted from a Williams-Sonoma recipe

1 3/4 cups all-purpose flour
3/4 teaspoon baking soda
1 teaspoon baking powder
1 1/2 tablespoons granulated sugar
1/2 teaspoon salt
3 eggs, separated
1 3/4 cups buttermilk
4 tablespoons unsalted butter, melted
Filling of your choice

In a bowl, whisk together the flour, baking soda, baking powder, granulated sugar and salt.

In a small bowl, lightly whisk together the egg yolks and buttermilk. Whisk the yolk mixture into the flour mixture until well combined; the batter will be lumpy.

In another bowl, using an electric mixer fitted with the whisk attachment, beat the egg whites on high speed until stiff but not dry peaks form, 2 to 3 minutes. Using a rubber spatula, gently fold the whites into the batter in two additions.

Put 1/2 of a teaspoon butter in each well of a filled-pancake pan.


Place over medium heat and heat until the butter begins to bubble. Pour one tablespoon of batter into each well and cook until the bottoms are golden brown and crispy, 3 to 5 minutes. Gently add your desired filling on top of each puff.


Next, top each filling with one more tablespoon batter. Using 2 wooden skewers, flip the pancakes over and cook until golden and crispy, about 3 minutes more.


Transfer to a plate. Repeat with the remaining batter and fillings.

Serve your savory ebelskivers with whatever side you like - we had extra bacon on the side and some homemade stewed applesauce.


Dust your sweet ebelskivers with confectioners' sugar and serve warm with maple syrup.


Makes about 40 filled pancakes.

Chocolate is a girl's best friend!


I know this post comes at a bad time for people like my mom, who gave up chocolate for Lent, but I was absolutely craving some gooey, rich, warm chocolate last week, and I had to make some brownies! I wanted to try out a new recipe that I'd seen in a magazine, but decided to make some major changes to it. These brownies turned out with a nice, deep chocolate flavor, delightfully crispy edges, and a moist, dense, and chewy texture.

Chewy Chocolaty Brownies
Inspired by Palmer House Brownies from Bon Appetit magazine

9 ounces bittersweet chocolate, chopped
1 cup butter
1 1/2 cups sugar
2 large eggs, at room temperature
1 teaspoon vanilla
1 cup flour, sifted
1 teaspoon baking powder
2 cups coarsely chopped walnuts (optional)

Preheat oven to 350 degrees, and apply cooking spray to an 8x8-inch square baking pan. (As you can see in my pics, I made 2 smaller pans because I like the chewy edges so much!)

In a small heavy saucepan over low heat, melt the chocolate and butter. Remove from heat and cool to lukewarm.

Blend eggs, vanilla, and sugar with an electric mixer until light in color and fluffy - about 1 minute. Pour melted chocolate mixture into the egg mixture, and whisk together until incorporated. Add sifted flour and baking powder. Fold in gently with a rubber spatula. Spread evenly in the prepared pan. Sprinkle walnuts over the brownie batter, pressing gently into the chocolate.


Bake for 40 minutes, or until the edges are crispy and set. Serve warm or cool with a big scoop of ice cream.

(My smaller pans only took about 30 minutes.)

Sunday, February 22, 2009

Golden Steak Fries


Just one more reason I am glad that I let my husband register for the mini fry-daddy . . .

Golden Steak Fries

2 Idaho potatoes
Plenty of cooking oil
Plenty of salt
Plenty of freshly ground pepper

In a large pot or a deep fryer, heat oil to 375 degrees. Meanwhile, slice your potatoes into long strips about and inch wide and 1/2 an inch thick, leaving the skins on. In batches of about 10-12 fries each, cook the fries in the oil until golden brown - about 5-7 minutes. Drain on paper towels and sprinkle generously with salt and pepper. Serve immediately with ketchup.

Creamy Salsa Dip


Here is an incredibly easy recipe for an incredibly luscious dip. You can adjust the amount of salsa to your taste. It also makes a great topping for burgers, nachos, or fries.

Creamy Salsa Dip

8 ounces of cream cheese
1/2 cup of your favorite salsa

In a microwave-safe dish, combine cream cheese and salsa. Cover and microwave for 20-second intervals, stirring between each interval, until completely melted and incorporated. Garnish with cilantro, if desired, and serve with tortilla chips.

Saturday, February 21, 2009

Mediterranean Turkey Burgers


Here is one of our favorite dishes to grill when the weather is nice. There have been a few mild evenings this February here in North Georgia - but tonight was not one of them. So we fired up the George Foreman grill instead!

Mediterranean Turkey Burgers
1 lb. ground turkey breast
2 ounces feta cheese, cubed or crumbled
2 tablespoons sun-dried tomatoes, sliced
3 tablespoons onion, finely chopped
2 teaspoons Greek seasoning
1 tablespoon extra virgin olive oil
Salt and pepper, to taste
4 hamburger buns, buttered and toasted/broiled/grilled

In a medium bowl, combine ground turkey, feta crumbles, sun-dried tomato, onion, Greek seasoning, olive oil, salt, and pepper. Toss lightly with a fork until ingredients are fully combined. Form the mixture into 4 equal patties, shaping lightly with your hands.


Grill using an outdoor grill, a grill pan on the stove, or (as we did tonight), a George Foreman grill. Cut into the burger to make sure that it is completely cooked, all the way through, before removing from the grill and serving. Remember that turkey meat isn't like ground beef - you can't cook it "medium" - you have to cook poultry until it is well-done.


Place one burger in each of your prepared buns, and top with special tangy sauce, and desired veggies, before serving.


Special Tangy Sauce
4 tablespoons mayonnaise
2 teaspoons lemon juice
1 teaspoon Greek seasoning
1/4 teaspoon garlic powder
Salt and pepper, to taste

Stir ingredients together in a small bowl. Spread generously on your turkey burgers, and enjoy!


Friday, February 20, 2009

Moon-Washed Apples of Wonder


This is the most wonderful, moist, dense, and deliciously cozy cake you have EVER put in your mouth. The perfect end to a hearty winter meal.

This recipe comes from my mom's sister - my sweet Auntie Heather. She is another one of the many great cooks in my family, so watch for more recipes from her in the future! You can tell how much we love this recipe by how worn and stained the recipe card looks.

Auntie Heather's Apple Cake
1 1/2 cup vegetable oil
3 eggs
1 teaspoon salt
1 teaspoon baking soda
2 teaspoons vanilla extract
2 cups sugar
3 cups flour
3 large, tart cooking apples - peeled, cored, and cut into chunks
1 cup pecans, chopped (optional)

Preheat oven to 325 degrees. Grease and flour a large bundt pan and set aside. In a large electric mixer bowl, beat vegetable oil and eggs on high speed for 3 minutes. Add the salt, baking soda, vanilla, sugar, and flour, and blend on low speed until incorporated. With a wooden spoon, fold in apples and pecans. Pour batter into prepared pan and bake for 1 hour and 20 minutes, or until toothpick inserted into center of cake comes out clean. Cool for 10 minutes in the pan, then turn out onto a cooling rack and allow to cool completely.

Brown Sugar Glaze
1 stick of butter
1/2 cup light brown sugar
1/2 cup dark brown sugar
2 tablespoons milk

Put all ingredients in a small saucepan, and place over medium-low heat, stirring until melted. Increase the heat and continue to cook until mixture reaches a boil. Allow to boil for one minute. Remove from heat and allow the glaze to cool for 20 minutes so that it can thicken. Then spoon it over the cake so that it drips lavishly down the sides.

Wednesday, February 18, 2009

Crock Pot Spinach Casserole


This spinach casserole has been one of my favorite dishes since childhood. The recipe came from the little booklet that came with my mom and dad's Crockpot that they got back in the early 70s. Over the years, we've upped the amount of spinach and also adapted it for a dutch oven, but it's still a family classic.

It's a great way to get kids to eat their spinach; it's a great way to get kids to love their spinach. It makes a delicious veggie side to go with dinner or it makes a great dip served hot with crackers. No matter how you serve it, you are going to love it!


Mom's Spinach Casserole
Adapted from Rival Crock Pot booklet from the early 70s

3 10-ounce packages frozen spinach, thawed and drained
2 cups cottage cheese
1/2 cup butter, cut into pieces
1 1/2 cups (about 8 oz.) american cheese, cubed (recommended: Velveeta)
3 eggs, lightly beaten
1/4 cup flour
1 teaspoon salt

Apply cooking spray to the inside of your crock pot. In a large bowl, combine all ingredients. Pour into prepared crock pot. Cook on high for 1 hour, then turn it down to low for 4-5 hours.

You may also use a dutch oven for this dish. Simply bake, covered, at 375 for 1 hour.

My Birthday Dinner


Isn't it beautiful?

Grilled Bacon-Wrapped Fillet Mignon
Baked Macaroni and Cheese
Sautéed Coins of Squash
Mom's Spinach Casserole
Parker House Rolls (not pictured, oops)
And Double Chocolate Cake for dessert!


Thanks for the wonderful birthday, everyone!

Tuesday, February 17, 2009

My Birthday Cake


Well, dear readers, today is my birthday. So last night, I found myself making my very favorite double-chocolate cake. We'll have dinner tonight at my parents' house and have this as my birthday cake for dessert.

I know what you're thinking: "What?! They make you do your own birthday cake?!"

Answer: "Heck, I love making my own birthday cake!"

My mom or Nanny (her mom) will always offer, but for someone like me who loves to bake, it's not a chore to make your own birthday cake - it's fun!!! Plus, this is my very favorite cake to make - it's easy, delicious, and super-chocolaty! The cake is light and fluffy, and the frosting literally melts in your mouth. What more could a birthday girl ask for?


Cocoa Fudge Cake

2 cups cake flour or 1 2/3 cups all-purposes flour
1 1/2 cups sugar
2/3 cup cocoa
1 1/2 teaspoons baking soda
1 teaspoon salt
1 1/2 cups buttermilk
1/2 cup shortening
2 eggs
1 teaspoon vanilla

Preheat the oven to 350 degrees. Spray baking pan, 13x9x2 inches, or 2 round 9" layer pans, 3 round 8" layer pans (as pictured here), or cupcake tins. Measure all of the ingredients into large electric mixer bowl. Blend for 30 seconds, scraping down the sides of the bowl constantly. Beat for 3 minutes on high speed, scraping bowl down when needed. Pour batter evenly into pan(s).


Bake oblong 35-40 minutes, layers 30-35 minutes, cupcakes 25-30 minutes. Or until wooden toothpick inserted into the center comes out clean. Cool completely before frosting.


Now for the frosting!


Laure's Buttery Chocolate Frosting

1 stick of butter, softened
4 tablespoons half 'n' half
1 teaspoon vanilla
3 cups confectioner's sugar
4 tablespoons unsweetened cocoa powder

In a small electric mixing bowl, beat butter, half 'n' half, and vanilla until creamy. Gradually add the confectioner's sugar, beating until light and fluffy. Add cocoa powder and blend until incorporated. Frost your cooled cakes as desired.


Monday, February 16, 2009

On Eagle's Wings


Made dessert for tonight with some goodies I had in the pantry . . . It had been years since I made the Magic Cookie Bars whose recipe is found on the back of the Eagle Brand Sweetened Condensed Milk can. I used 3 different kinds of nuts in these in order to really highlight the wonderful flavor of these classic treats!


Triple-Nut Magic Bars

1 1/2 cups graham cracker crumbs
1/2 cup butter, melted
1 14-ounce can sweetened condensed milk (recommended: Eagle's)
1 1/2 cups semi-sweet chocolate chips
1/2 cup almonds, chopped
1/2 cup hazelnuts, chopped
1/2 cup walnuts, chopped
1 cup coconut flake

Preheat your oven to 350 degrees. Apply cooking spray to a 9"x13" pan and set aside.

In a small mixing bowl, combine graham cracker crumbs and melted butter. Press the mixture into the bottom of the prepared pan to form a crust. Pour condensed milk evenly across the crust. Layer remaining ingredients over the condensed milk.

Bake for 25-30 minutes, or until topping is golden brown. Cool and slice into 1"x3" bars. Enjoy!

Blueberries, Bananas, and Oats - Oh My!


These muffins are chock-full of some of my favorite ingredients. I combined about 5 recipes to come up with this one so that I could get all of my favorite things in one healthy muffin! Crispy on top, fluffy in the middle, and full of delicious flavor. You will never be able to tell that these are low in fat and high in fiber!

VV Tip: If you ever end up with that one lonely banana left over that turns brown, throw it in the freezer. This way, you can keep your bananas perfectly ripe until you're ready to bake something with them! I usually freeze one here and there until I have enough to make some banana bread or some muffins.


Banana-Blueberry-Oat Muffins

1 1/2 cups 100% whole wheat flour
1 cup oats, rolled or quick
1/4 cup brown sugar, packed
1/4 cup sugar
2 teaspoons baking powder
1 teaspoon baking soda
1/2 teaspoon salt
1/2 teaspoon cinnamon
2 eggs
1/4 cup apple sauce
1/4 cup buttermilk or fat free sour cream
1 cup mashed ripe bananas
1 cup blueberries, fresh or frozen

Preheat your oven to 400 degrees. Line or grease the wells of a cupcake pan.

In a large bowl combine flour, oats, sugars, baking powder, baking soda, salt, and cinnamon. Whisk until completely combined.

In a small bowl, beat together eggs, applesauce, sour cream, and bananas. Pour the liquid ingredients into the bowl containing the dry ingredients and stir until almost completely moistened. Add the blueberries and continue stirring JUST until completely moistened. Your batter should be lumpy. Don't over-mix or your muffins will be rubbery.

Fill muffin cups about 2/3 of the way full. Bake for 17-20 minutes, or until golden brown and a toothpick inserted in the center comes out clean.

You can mix up the batter the night before and bake the muffins fresh in the morning. They also freeze very well.

Sunday, February 15, 2009

Trading Recipes


"I refuse to believe that trading recipes is silly.
Tuna fish casserole is at least as real as corporate stock."
- Barbara Grizzuti Harrison

Here is my all-time favorite, old-fashioned recipe for tuna casserole. I got it from a friend back in high school, and it's been a go-to meal for me ever since. It is wonderful the first night, but the leftovers just get better and better. Some of the ingredients may seem strange - but just trust me, dear readers, just trust me.

Tuna Casserole with French Fried Onions
1 box tri-color rotini, cooked and drained
1 can condensed cream of chicken soup
1/2 cup milk
1/3 cup peas (fresh, frozen, or canned)
3 5-ounce cans solid white albacore tuna in water, drained
2 teaspoons Mrs. Dash seasoning, or other all-purpose seasoning blend
1 teaspoon Worcestershire sauce
1 1/2 cup shredded mexican cheese blend, divided
1 cup french fried onions, divided
Salt and pepper to taste.

Preheat oven to 350 degrees. Grease a 9x13" baking pan.

In a large mixing bowl, combine cooked pasta, soup, milk, peas, tuna, Mrs. Dash, Worcestershire sauce, 1 cup of the mexican cheese, and 1/3 cup of the french fried onions. Test the mixture, and add salt and pepper to taste

Spread the mixture evenly in the prepared baking dish. Sprinkle some extra Mrs. Dash on top, if desired.


Bake for 30 minutes, and remove from the oven. Sprinkle the remaining 1/2 cup of mexican cheese on top. Then sprinkle over that the remaining 2/3 cup french fried onions. Return the dish to the oven for 5-10 minutes, until cheese is melted and onions are crispy and browned.


This casserole freezes well - you can freeze before or after baking it.
 

Made by Lena