Showing posts with label Chicken. Show all posts

Monday, August 24, 2009

Healthy Crock Pot Chicken


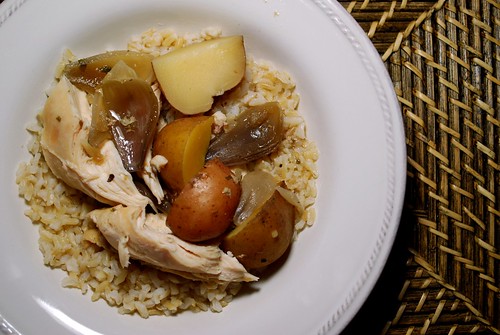
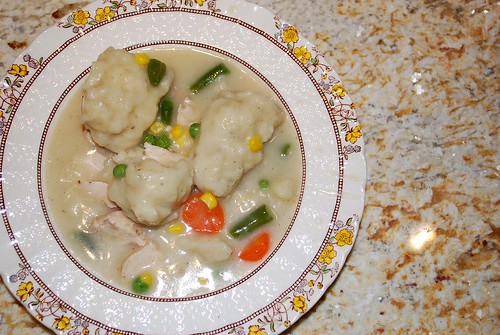
Trying to stay healthy but still love the ease and convenience of a nice, hearty crock-pot dinner? Have I got the recipe for you! This is a rustic, hearty, and flavorful meal that slow cooks to perfection but does not include any of those creamy condensed soups that have a tendency to pack a lot of calories and fat. This is also an extremely versatile recipe - your chicken can be almost any cut, even a whole chicken would work. And as for the veggies? Whatever you have on hand can be thrown on in there - we used onions and potatoes this time, but carrots, celery, even green beans would be delicious.

Healthy Crock Pot Chicken


2-3 medium potatoes, quartered
2-3 small red onions, quartered
Carrots and celery would be good, too, but we didn't have any on hand
2 cups water
1 chicken bouillon cube/packet (sodium-free)
1 tablespoon poultry seasoning
1 dash Worcestershire sauce
1 teaspoon dried parsley
Salt and pepper to taste
2 bone-in chicken breasts (boneless will work, too, but bone-in = more flavor!)

Place the potato and onion wedges in the bottom of your crock pot. Cover with water. Stir in bouillon, poultry seasoning, Worcestershire, parsley, and salt and pepper. Place the chicken breasts on top. Season the meat with salt and pepper to taste. Cover and cook on low for 6-8 hours.

Remove the bones before serving (the meat will be so tender that it should fall right off). Serve the chicken and veggies over cooked brown rice or whole-grain pasta, if desired. Pour some broth over the top for extra flavor.


Tuesday, July 21, 2009

Green Chilaquiles


So, you know me, dear readers. I can't just stop at making salsa out of my tomatillos. I had to incorporate them into a fabulous new dish! I kept reading about green chilaquiles - basically glorified nachos with chicken and tomatillo salsa. I decided to go for it, even though my husband is not a huge fan of chips or nachos.

He ate three bowl-fuls of this stuff!

This dish was delicious! The toasty cheese compliments the tangy salsa perfectly, all atop deliciously moist chicken and crunchy tortilla chips. This one is a keeper!!!

Green Chilaquiles

3-4 big handfuls tortilla chips
1 cup salsa de tomatillo (see recipe above)
2 cups shredded cooked chicken
1 cups shredded monterrey jack cheese
Cilantro, for garnish

Preheat your oven to broil, and grease a 9x9-inch baking dish. Lay a generous bed of tortilla chips across the bottom of the prepared dish. Spread an even layer of chicken over the top of the chips. Drizzle the salsa de tomatillo evenly across the chicken and sprinkle with the cheese.

Broil for 2-3 minutes, until the cheese is melted and bubbly. Garnish with cilantro and serve immediately.


Thursday, July 16, 2009

Chicken and Rice Salad


During the summer here in Georgia, there are days that are so swelteringly hot that you are loathe to turn on any heat-generating appliance in the house. Today was one of those days.

So what do you do for dinner on a day like this? Make a nice, hearty, cold salad like this one!!

Chicken and Rice Salad
my mom's friend Sue

2 6-ounce boxes long grain wild rice (recommended: Uncle Ben's)
3 ½ cups cooked chicken, torn into bite-sized bits
4.5 ounces ripe black olives drained and chopped
½ cup chopped green onion w/ tops
½ cup pecans chopped
1 cup celery, chopped
salt and pepper
1 ½ cup mayo (add gradually)
2 tablespoons chopped fresh parsley

Cook rice according to the directions, but omitting any seasoning packet that might come with the box. Toss all ingredients together except for the mayo and parsley, seasoning with salt and pepper to taste. Stir in the mayo gradually, using only as much as needed to suit your tastes. Chill until ready to serve. Garnish with parsley. Serve with iceburg lettuce cups to make tasty wraps!


Thursday, June 18, 2009

Crispy Baked Chicken


I have to admit to you, dear readers, that there was a time when I was intimidated by the task of baking chicken. It seems so simple - put it in the oven until it's done, right?

But how do you know when your chicken is cooked through? Until the inside isn't pink? Until the juices run clear?

But was the inside pink to begin with? And did the juices ever NOT run clear?

I just couldn't figure it out. I either ended up with chicken that I was too scared to eat, or chicken that was too tough to eat!

Well, the best purchase I ever made was the $1.99 meat thermometer that I bought at the supermarket one day. Stick it in your chicken breasts when you think they are close to being done, and see if it registers 180 degrees. If so, then you're good to go! Juicy, tender chicken that is safe to eat.

So shell out the extra two bucks for a meat thermometer and try out this amazingly tasty chicken. Crispy on the outside, juicy on the inside - you are going to love this stuff!


Crispy Baked Chicken
inspired by Pioneer Woman

4 chicken breasts, cleaned
1 cup fat free Greek style yogurt (or any plain yogurt)
1 1/2 cups panko bread crumbs (crushed cornflakes do the trick, as well)
1/2 teaspoon garlic powder
2 teaspoons your favorite seasoning blend (Mrs. Dash, herbes de provence, cajun, whatev)
Salt and pepper to taste
4 thin tabs of butter

Preheat your oven to 375 degrees. Grease a 9x13 inch baking dish and set aside.

You can start by either marinating or simply coating your chicken in the plain yogurt. Either way works fine. In a shallow dish, combine the panko breadcrumbs with the garlic, seasoning blend, and salt and pepper. Completely coat each piece of chicken with the bread crumb mixture, and place in the baking dish, about 1 inch apart. Top each chicken breast with a thin tab of butter.

Cover with foil and bake for 50-60 minutes, until chicken is cooked through and your meat thermometer registers 180 degrees when inserted into the center of the meat. Serve immediately.


Friday, May 22, 2009

Pesto and Goat Cheese Stuffed Chicken


Here is an amazingly flavorful chicken recipe from my friend Ashley. We loved the freshness of the basil with the sweet sundried tomato and the tang of the creamy goat cheese. This is the perfect upscale weeknight dinner!


Pesto and Goat Cheese Stuffed Chicken
adapted from a recipe by Ashley of HauteCakes

4 chicken breasts, pounded to about 1/4-inch thin
1/2 cup sundried tomato pesto (you can buy this at the grocery store or make your own)
1 large clove of garlic, minced
7-8 large fresh basil leaves
about 2 ounces of goat cheese
Salt and pepper to taste

Preheat your oven to 350 degrees. In a blender or food processor, blend the pesto, basil leaves, garlic, and goat cheese, just until combined. Spread the mixture over each chicken breast, and roll it up, securing with toothpicks. Sprinkle with salt and pepper to taste.


Bake, uncovered, for about 45-60 minutes, or until chicken is cooked through. Remove the toothpicks and serve hot with your favorite veggies.


Tuesday, May 19, 2009

Herb Roasted Chicken Breasts


A healthy dinner for a spring weeknight with fresh herbs from the garden. The marinade makes this chicken extra tender. The blend of fresh herbs makes it irresistible!

Paul Newman's dressing has been a favorite marinade in my family for a long time - it is great on chicken, pork, and especially london broil. The blend of herbs adds an earthy fragrance, and compliments the tender, juicy chicken perfectly.

Herb Roasted Chicken Breasts
2 fresh split chicken breasts (w/ bone and skin)
1 sprig rosemary, leaves removed
3 stems of thyme, leaves removed
1 handful flat italian parsley
4-5 sage leaves
1/4 cup balsamic vinaigrette (recommended: Newman's Own)
3 tablespoons olive oil

Clean the chicken breasts and place them in a large ziplock bag.

In a blender or small food processor, measure all the rest of the ingredients. Blend on high speed for about one minute, until herbs are chopped fine and liquid is emulsified. Pour the marinade into the bag with the chicken, schmooshing it around until the chicken is completely coated. (And yes, schmooshing is the technical term.) Refrigerate for at least 30 minutes or up to overnight.


Preheat the oven to 375 degrees. Place the chicken and the marinade in a greased baking dish and cover with foil. Bake for about 1 hour, until a meat thermometer inserted into the meat registers 180 degrees. Serve immediately with your favorite veggies and sides.


Tuesday, May 12, 2009

Garden Pesto Tortellini


This meal was the unplanned love-child of a rushed trip to the grocery store and a night of cleaning out the fridge. When I asked the hubs what we should call it, he said something like "Good Garden Pasta Surprise." I said, "Um, no."

Garden Pesto Tortellini
1 package of refrigerated cheese-filled tortellini
12-15 spears of asparagus, washed and cut into 1" pieces
2 big handfuls of fresh spinach, roughly chopped
1/3 cup sundried tomatoes, sliced and reconstituted in water (soak for 10 min.)
1 cup fresh basil pesto (buy pre-made or click here for recipe to make your own)
1 1/2 to 2 cups cooked chicken, torn into bite-sized pieces (optional ~ for vegetarians)

In a large pot of boiling water, cook tortellini according to package instructions. When they have about 3 minutes left to boil, throw the asparagus, spinach, and tomatoes into the water with the tortellini. Drain and return to pot. Add the pesto and the chicken, tossing to coat.

Serve immediately with toasty garlic bread. Or chill thoroughly and serve as a fresh tortellini salad!


Monday, April 27, 2009

Pizza with Goat Cheese, Chicken, Sundried Tomatoes & Spinach


"Vish ish awshoum!"

These are the words that came out of my husband's mouth tonight as he ate his slice of pizza.

Have I mentioned that my husband hates pizza?

Well, my husband - he hates pizza. He has been known to call pizza "the torture food." As in, "Honey, why don't we order pizza tonight?" - "Oh great, the torture food."

(For those keeping score, America's Next Top Model is known as "the torture show.")

After he swallowed, he declared, more clearly, "I eat my words." I have succeeded in rehabilitating my husband from his post-college pizza-hangover, to the point where he actually likes pizza.

(I wonder if I'll be able to get him to say the same thing about ANTM one day?)

I made this recipe tonight in an attempt to re-create a dish that I used to enjoy when I was a college student in Washington, DC. On lovely spring afternoons, like the ones we've been enjoying lately here in North Georgia, my friends and I would walk over to a little Italian restaurant in our neighborhood, and this pizza is the dish I would order almost every single time. It is a combination of five of my favorite foods: pizza, goat cheese, chicken, sun-dried tomatoes, and spinach.


Paolo's Pizza

1 lb. raw pizza dough
3/4 cup tomato pizza sauce
8 oz. shredded mozzarella cheese (part skim makes it less greasy)
1/4 cup sliced sun-dried tomatoes, reconstituted in water for 10 minutes
2 ounces goat cheese (chevre), chilled
1 1/2 cups shredded cooked chicken (I recommend rotisserie chicken)
1 1/2 teaspoons Italian seasoning (or a mixture of dried basil and oregano)
2 large handfuls of baby spinach, roughly chopped

Preheat your oven to 400 degrees. Grease a large rectangular or round baking sheet or pizza pan. Roll out the pizza dough to desired thickness and place it on the prepared baking sheet. Spread the pizza sauce over the dough, leaving the edges as a crust. Arrange the shredded mozzarella evenly over the sauce.

Next, sprinkle the sun-dried tomatoes over the cheese. Then drop the goat cheese in tiny globs evenly across the pizza. Spread the chicken over the top, and sprinkle the italian seasoning evenly over the crust.


Bake for 10 minutes. Remove from the oven and sprinkle the spinach on top. Return to the oven for another 3-5 minutes. Slice and serve immediately.


Thursday, April 23, 2009

Fresh Basil Pesto Pasta with Grilled Chicken


Just the smell of fresh basil makes me weak in the knees. Luckily, ti's not a treat reserved only for summertime in our house. For my birthday a couple years ago, my sweet hubby got my an AeroGarden. This thing is amazing - we grow enough basil to have pesto about every other week! I'm planning on doing a more detailed post about this nifty gadget, but for now, here is my pesto recipe.

Classic pesto is simply a blend of basil leaves, cheese, nuts, garlic, and olive oil. It goes well with creamy cheeses on toasted crostini or crackers. It also goes extremely well with fish and chicken dishes (think grilled chicken or smoked salmon).

Our favorite, though, is to toss some farfalle (bow-tie) noodles with the pesto, topped with chunks of smokey grilled chicken.

Fresh Basil Pesto
recipe from our dear family friends Judy and Joe

1 cup fresh basil leaves, packed
1/4 cup parmigiano reggiano cheese, grated
3 tablespoons toasted pine nuts or walnuts
1-2 garlic cloves, minced
1/4-1/2 cup extra virgin olive oil
Salt and pepper to taste

Measure all your ingredients except for the olive oil into your food processor. I like to use my mini-processor for making pesto:


Pulse several times to chop the leaves and nuts into the other ingredients. Then slowly stream the olive oil in while you process the pesto on medium speed. Add just enough olive oil to reach your desired consistency (tip: make your pesto thicker for a spread, thinner for a sauce). Season to taste with salt and pepper.

Yield about 1 cup of pesto. Serve as desired (with cheese and crackers, tossed with pasta, as a glaze for roasted veggies, etc.).

Refrigerate and use yourfresh pesto withon 2-3 days OR freeze individual portions in an ice cube tray to use at your leisure!


Thursday, April 16, 2009

How to Make Your Own Chicken Stock


So we all buy those nice convenient little roasted chickens at the grocery store, right? They are a great shortcut for those recipes that call for cooked chicken. Well, why not make your chicken go twice as far by using the carcass to make some chicken stock? Here is a great, basic recipe. I used the recipe from my kitchen bible, The Joy of Cooking, and adapted it for the crock pot to make things extra-easy!

Basic Chicken Stock
adapted from The Joy of Cooking

1 chicken carcass
4 quarts of water
10 pepper corns
6 whole cloves
1 bay leaf
2 teaspoons parsley
1 teaspoon thyme
1 medium onion, peeled and roughly chopped
1 medium carrot, peeled and diced
3 ribs of celery, roughly chopped

Place the chicken carcass in your crock pot. Pour the water over it and add the rest of the ingredients. Cover and cook on low 6-8 hours; on high 3-5 hours. I left this batch on low overnight.


Strain well. Refrigerate or freeze in mason jars or ziplock bags until you are ready to use your stock!


Tuesday, April 14, 2009

American Style Chicken-n-Rice Stuffed Peppers


Here's a little number I made up on the go for a delicious and healthy weeknight supper. So you've seen Italian stuffed peppers, well what would an "American" version look like? Something like this. A creamy filling of chicken and rice crowned with a gooey dollop of white American cheese. It's definitely a different combination of flavors, but they come together beautifully.


Chicken-n-Rice Stuffed Peppers
from my very own little hungry brain

4 green bell peppers
2 cups brown rice, cooked in water or chicken broth
2 chicken breast, baked or boiled and shredded
1/4 cup onion, minced
1/2 cup peas, frozen/canned/fresh/whatever
1/2 teaspoon garlic
1/4 teaspoon freshly ground black pepper
1/4 teaspoon sage
2 dashes of Worcestershire sauce
1 can light condensed cream of chicken soup
1/4 cup milk
4 slices white American cheese

Preheat your oven to 375 degrees and grease a large baking dish or baking sheet. Clean and core your peppers, being sure to get out the vein in the center and all the seeds. Make sure your rice is properly cooked, and shred your chicken breasts.

het a medium skillet over medium heat and spray with cooking spray. Toss in your onion and cook for about 2 minutes, until onions become fragrant and begin to turn translucent. Add chicken, rice, peas, garlic, pepper, sage, Worcestershire, condensed soup, and milk, stirring to combine. Cook for about 3 more minutes, just to combine and heat through.

Spoon the chicken mixture into the prepared peppers, heaping the filling on top if necessary. Bake for about 20 minutes. Remove from the oven, and top each pepper with a slice of American cheese. Turn your oven up to broil, and return the peppers to the oven for 2-3 minutes, until cheese melts and begins to brown. Serve immediately.

Saturday, April 11, 2009

Easy Cheesy Chicken Enchiladas


¡Hola, Readers!

It's Mexican night here at Vintage Victuals!
So, what's on the menu, you ask?

This is one of our favorite meals - it's a fabulous fiesta! These enchiladas are so easy, but full of flavor. The perfect balance of spices and cheese, they are perfect for a weeknight meal or for a festive cinco de mayo party.

Easy Cheesy Chicken Enchiladas

2 cups cooked chicken, shredded (roasted chicken is the best, but boiled breast meat works, too)
1/2 cup sour cream
1/2 cup Mexican cheese dip (see photo below)
1/2 cup shredded Mexican cheese blend
1 3.5 ounce can green chilies
1 1/2 teaspoons fajita seasoning
Half a pinch of red pepper flake
1/8 teaspoon freshly ground black pepper
2 shakes Tabasco hot sauce
1/4 cup chopped fresh cilantro
8 soft-taco-sized tortillas (I like flour, but corn tortillas are more *authentic*)
1/2 cup enchilada sauce ((recommended: Trader Joe's)
1/2 cup more shredded Mexican cheese blend


Grease a 9x13 -inch baking dish, and preheat your oven to 375 degrees.

In a large bowl, combine the shredded chicken, sour cream, cheese dip, shredded cheese, green chilies, fajita seasoning, red pepper flake, pepper, Tabasco, and cilantro - until thoroughly mixed. Take tortillas, one at a time, and fill with about 1/2 cup of the chicken mixture. Roll the tortilla up, and place the enchilada, seam-side-down, in the prepared baking dish. Pour the enchilada sauce over the top, like so . . .


Bake for 20 minutes, until sauce is bubbly and tortillas begin to turn golden. Remove from the oven and sprinkle with the second 1/2 cup of shredded cheese. Return to the oven for 5-10 minutes, until cheese is melty and caramelized. Serve with your favorite Mexican sides, and perhaps a margarita! Enjoy!

Wednesday, April 8, 2009

Cheez-It Chicken


As a southern girl, it is my right - nay, my duty - to use copious amounts of cheese in my cooking. For me, this is not a problem. At all. Not only is my favorite food macaroni and cheese, but I really am a very big fan of cheese all-around, as you can tell from the sheer number of posts on this blog that involve cheese.

My weakness when it comes to snacky foods? Crunchy, salty, savory, cheesy chips. I'd say it's a tie for all-time favorite between Cheez-Its and Cheetos. Doritos and those Kettle Chips with New York Cheddar and Herb come in at a close second.

So does it surprise you to see me using Cheez-Its to make dinner? It really shouldn't. I thought you knew me better by now, dear readers . . .

This chicken has a crunchy, tangy crust but inside it's more juicy and tender than your wildest chicken dreams.


Cheez-It Chicken

4 skinless boneless chicken breasts
Salt and pepper to taste
1/4 cup sour cream
1/4 cup buttermilk
1 1/2 cups cheez-its, crushed in a baggie or using a food processor

Preheat your oven to 325 degrees. Grease an oven-safe dish that your chicken will fit in comfortably. Rinse your chicken breasts and pat them dry with paper towel. Season on both sides with salt and pepper, to taste. In a shallow dish, combine the sour cream and buttermilk. Arrange the crushed Cheez-Its in a second shallow dish. Dip each chicken breast into the sour cream mixture, then into the Cheez-Its so that they adhere and form a crust. Place the chicken in your prepared baking dish, leaving about 1" between the breasts.

Cover with foil and bake for 45 minutes. Then remove the foil and bake for an additional 15 minutes. Enjoy!

~~***~~

PS: Pretty rockin' photos, huh?! I used my brand new light box mini photo studio made out of a box, tissue paper, and a piece of poster board. Check out how to make your own here.

Monday, March 16, 2009

Chicky-Chicky-Parm, Chicky-Chicky-Parm


Have I ever mentioned that my brothers are a little bit silly? Yeah, they used to sing "Chicky-Chicky-Parm, Chicky-Chicky-Parm" whenever my mom would make us Chicken Parmesan. And they always did it with this incredibly catchy but annoying rhythm to it. So now I'm cursed because what I think of every time I have Chicken Parmesan!!

Here is an easy and "lighter" (i.e. not fried) version of this dish that you can make in the crock pot. It even came out pretty crispy on the top. Don't ya just love it when things are easy AND delicious?!

Crock-Pot Chicky-Parm

4 raw skinless boneless chicken breasts;
1 cup flour
1 egg, lightly beaten
1 cup panko bread crumbs
1/4 cup freshly grated parmigiano reggiano cheese (plus extra for sprinkling)
1 teaspoon salt
1/2 teaspoon pepper
1 teaspoon Italian seasoning
1 jar of your favorite marinara sauce
1 cup shredded mozzarella cheese
Fresh parsley or basil for garnish

NOTE: Chicken can be fresh OR frozen. For frozen (which I used here), simply add an extra hour of cooking time.


Apply cooking spray to the inside of your crock pot. Next, set up three shallow bowls. In the first bowl, place the flour and half of the salt and pepper. In the second bowl, place the lightly beaten egg. In the third bowl, place the panko bread crumbs, the parmigiano reggiano, the rest of the salt and pepper, and the Italian seasoning. Take your chicken breasts one at a time, and dip them first in the flour, coating completely. Next coat with the egg mixture. Finally, coat with the panko mixture. Then place the chicken breast in the bottom of your crock pot. Repeat with the other chicken breasts.

Pour your marinara sauce around the sides of the chicken breasts. (Around, not on top - this will keep the tops crispy.) Sprinkle a few more tablespoons of the parmigiano reggiano cheese on top of the breasts. Cover and cook on low for 7-9 hours. During the last hour of cooking, top the chicken with the shredded mozzarella cheese so that it can melt and get nice and bubbly. Garnish each serving with fresh parsley or basil. Serve with spaghetti or angel-hair pasta.

Thursday, March 5, 2009

Chicken Squares


Here is a recipe from my husband's side of the family. As I may have mentioned before, my mother-in-law is an amazing cook. She found the inspiration for this recipe in a magazine when my husband was a baby. It's evolved over the years into a family favorite, which my husband made for me for the very first time this week. Let's just say, I'm a believer in Chicken Squares now. The crusty, flaky, buttery pastry opens to reveal a molten hot filling of creamy, cheesy, fragrant chicken. Be careful, because these little babies are additively good.


Chicken Squares

2 tubes of 6 Pillsbury crescent rolls
1 10-ounce can of chicken breast meat, drained
(note: 1 cup leftover cooked chicken, shredded, will also work)
8 ounces of cream cheese
1/4 cup onion, finely chopped
1 1/2 teaspoons Worcestershire sauce
Dash of salt and pepper

Preheat oven to 350 degrees. Apply cooking spray to a large baking sheet and set aside.

Roll out the crescent dough and divide into rectangles, pinching the seam of the 2 triangles together to form oblong rectangles of dough.

In a medium bowl, combine chicken, cream cheese, onion, Worcestershire sauce, and salt and pepper, creaming the ingredients together.

Spoon a dollop of the chicken mixture onto one side of each crescent rectangle. Fold one end of the rectangle over the filling to form a square. Pinch the dough together around the edges to seal, and place the squares on prepared sheet.


Bake the chicken squares for 20-25 minutes or until the crescent rolls are golden brown. Serve immediatly with rice and peas. Yield 6-8 chicken squares.


(Or if you're like me and don't like peas, then you can have green beans instead!)


Edit/Update: I have gotten so much great feedback on this post, that I wanted to share with you some of the variations and ideas I've heard about from readers who have experimented with it!
  • adding bell peppers or other veggies to the filling
  • adding shredded Swiss cheese to the filling
  • adding ranch seasoning mix to the filling
  • adding fresh herbs to the filling
  • adding bleu cheese crumbles and Texas Pete Hot Sauce to the filling
  • using broken-up meatloaf and shredded sharp cheddar cheese as the filling
  • using taco-seasoned ground beef and Mexican cheese as the filling, serve with guacamole and sour cream
  • using ground beef hash as the filling, serve with ketchup
  • using ricotta, spinach, and chicken as the filling
  • using cheddar, ham, pineapple as the filling
  • using granny smith apple, cheddar, bacon as the filling
The possibilities are endless!!! I'd love to hear what else you come up with, dear readers - I love hearing from you when you've tried my recipes. I especially enjoy hearing about how each reader adds their own creative tweak to these recipes! Feel free to post comments or to email me!

Thursday, February 12, 2009

The Lavender-Scented Hills of Provence


Get ready because I am about to introduce you to the best chicken nuggets of your LIFE! Step aside, Chick-fil-A - these are freakin' awesome!

I made this recipe up on the fly with a new seasoning mixture that I had been wanting to try out - a new jar of Herbes de Provence - absolutely delicious, extremely aromatic, and a perfect compliment to chicken.

Crispy Provençal Chicken Nuggets

2 tablespoons extra virgin olive oil
2 tablespoons vegetable oil
2 chicken breasts, cleaned and cut into 1" pieces
1 cup flour
1 teaspoon salt
1 teaspoon freshly ground black pepper
1 large egg, lightly beaten
1 1/2 cup panko bread crumbs
1 1/2 teaspoons herbes de provence
1 teaspoon salt

Preheat your oven to 350 degrees. Pour your oil into a large baking dish or 9x13" pan, mixing the oils together. Set aside.

Next, you want to set up three shallow bowls on your counter for a dipping-assembly-line. Set up your chunks of chicken at the beginning of the line. In the first bowl, mix together the flour, salt, and pepper. In the second bowl, lightly beat your egg. In the third bowl, mix together your panko bread crumbs, the herbes de provence, and the second teaspoon of salt.

Next, just take each chunk of chicken, coat it in the flour mixture, then coat it in the egg, and then roll it around in the panko mixture and put it in your prepared baking dish! You should have just 1 layer of chicken on the bottom of your dish. If you have any panko mixture leftover, I would just pour it over the top for some extra crispiness.

Bake, ocvered, for 25 minutes. Then remove the cover and bake for another 10-15 minutes (depending on the size of your nuggets).

If you want, you can turn them over half way through, but I was too lazy - they still turned out nice and crispy on both sides!

Wednesday, February 11, 2009

Chicken 'n' Dumplings!


This is one of my all-time favorite meals to make. Back when I was a single gal, this was my go-to dinner when I was cooking for one. It's easy to scale to the number of portions you need. The soft, fluffy, doughy dumplings are so comforting, and the chicken and veggies complete the perfect meal.

Also, feel free to get creative with this simple recipe. It's a great way to use up your leftover chicken or turkey meat, but you can totally jazz it up. Add your favorite herbs and seasonings - I usually make it with whatever strikes me that particular day, whether it's parsley, herbes de provence, sage, thyme, savory, poultry seasoning, Montreal chicken seasoning, garlic, onions, Greek seasoning, or - my favorite - a blend of dried Tuscan seasoning. And you can add whatever veggies you happen to have on hand - although using a frozen veggie mix is awfully convenient!

Chicken 'n' Dumplings
3 14-ounce cans low-sodium chicken broth
1 cup water
1/2 teaspoon dried minced onion
1/2 teaspoon garlic
1/2 teaspoon freshly ground black pepper
2 cups Bisquick
1 1/2 teaspoons Tuscan seasoning (Greek seasoning and poultry seasoning are also great)
2/3 cup milk
1 package frozen mixed veggies
2 cups cooked chicken or turkey, shredded or cut into chunks
Salt and pepper to taste

Pour the chicken broth and water into a large, heavy saucepan. Season the broth with onion, garlic, and ground pepper. Bring to a simmer over medium heat.

Meanwhile, in a medium bowl, combine the Bisquick and the Tuscan seasoning. Add the milk, stirring lightly just until a soft dough forms.

Drop the dough by rounded spoonfuls into t he simmering broth. Allow the dumplings to simmer uncovered for 10 minutes. Then, cover your pot and allow to simmer for another 10 minutes.


Cook mixed veggies according to package instructions (usually just microwave or steam for a few minutes). When dumplings have finished simmering, pour in your mixed veggies and your chicken or turkey and stir together lightly.


Allow the mixture to return to a good simmer, and serve while it's nice and hot!


Made by Lena