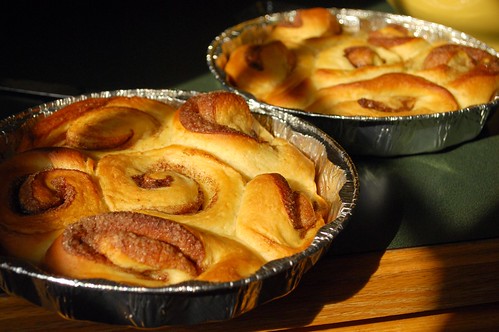
Tuesday, June 30, 2009

Cinnamon Rolls with Maple Glaze

I made a few changes to a very trusty cinnamon roll recipe, and the results were delicious. I sold pans and pans of these happy little buns at the Farmer's Market last weekend. They were a big hit! Buttery, rich, and delicious with a delicate maple glaze on top.

Cinnamon Rolls
adapted from the Bread Baker's Apprentice

6 1/2 tablespoons granulated sugar
1 1/2 teaspoons of fine sea salt
5 1/2 tablespoons butter flavored shortening
1 large egg, lightly beaten
1 teaspoon vanilla extract
1 1/2 cups unbleached bread flour
2 cups unbleached all-purpose flour
2 teaspoons instant yeast
1 1/4 cups whole milk

6 tablespoons sugar
1 1/2 tablespoons ground cinnamon

1 cup powdered sugar
3-4 tablespoons pure maple syrup

In an electric mixing bowl, cream the sugar, salt, and shortening. Add the egg and the vanilla extract and continue to beat until light and fluffy. Finally, add the flour, the yeast, and the milk to the mixture and blend until a soft dough forms. Use your dough hook to knead the dough at medium speed for about 10 minutes, or knead by hand on a lightly floured surface for 12 minutes. The dough should be supple and tacky, but not sticky. As you knead, add flour or water as needed to obtain this consistency in the dough.

Oil a large bowl and transfer the dough into it, turning to coat. Cover with plastic wrap and allow the dough to rise for about 2 hours, or until the dough has doubled in bulk.

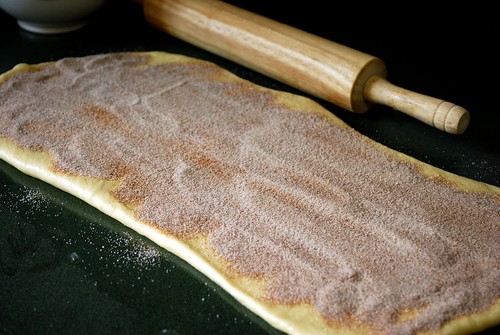
Mist your clean counter with cooking spray and transfer the dough onto the counter. Roll your dough out into a large rectangle, about 9 inches by 18 inches. In a small bowl, combine the cinnamon and sugar. Sprinkle evenly over the dough.


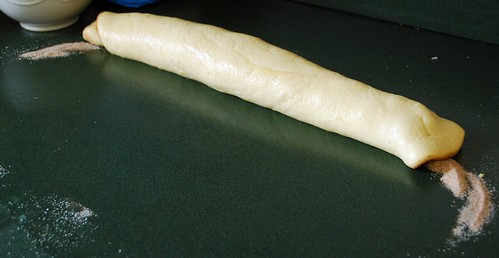
Next, roll the dough upstarting at one of the longer ends and finishing at the other end. Place the dough seam-side down on the counter.


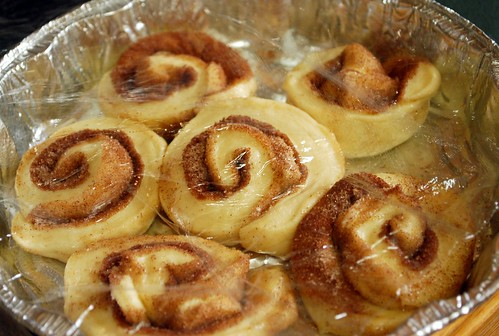
Using a sharp knife, slice the dough into rolls about 1" thick and place the rolls onto a greased baking sheet or round oven-safe dish, about 1/2" apart. Cover with saran.

At this point, you can either refrigerate your rolls for up to 2 days if desired. If you do this, then remove the rolls from the refrigerator about 3-4 hours before you plan to bake them so that they can come to room temperature and rise.

Otherwise, go ahead and allow the shaped rolls to rise for 75-90 minutes, until they double in size.


Preheat your oven to 350 derees. Bake the rolls for about 20 minutes. or until they begin to turn golden brown. Cool for 10 minutes before removing them to a cooling rack.

In a small bowl, combine the powdered sugar and maple syrup, mixing to form a thin glaze. Drizzle over the warm buns just before serving. Enjoy!


Monday, June 29, 2009

My Best Banana Nut Bread


Dear readers, this past weekend was my very first farmers market selling bread on our town square. It was so much fun! The whole experience was an all-around success. I made new friends, got to know some local farmers, and even traded a few loaves for some fresh produce for next week's baked goods!

In preparing for this fun adventure, I went to some of my tried-and-true go-to recipes. Here is my very best banana nut bread. I've been making it for 10 years or so, and it's evolved with tweaks here and there. These little babies sold like hotcakes on Saturday morning!

My Best Banana Nut Bread
originally based on a recipe from Allrecipes.com

1 3/4 cups all-purpose flour
2 teaspoons baking powder
1/4 teaspoon baking soda
1/2 teaspoon salt
1/2 teaspoon cinnamon
A pinch of nutmeg
2/3 cup sugar
1/3 cup butter, softened
2 eggs
1 1/4 cup mashed banana
1 teaspoon vanilla
1/2 cup chopped walnuts (optional)

Preheat your oven to 350 degrees. Grease a loaf pan and set aside.

Sift together the flour, baking powder, soda, salt, cinnamon, nutmeg, and sugar in a large bowl. Add the butter, eggs, banana, and vanilla, mixing just until combined. Stir in the nuts, if desired.

Pour the batter into the prepared loaf pan and bake for 50-55 minutes or until a toothpick inserted into the bread comes out clean. Cool in the pan for 10 minutes before turning out onto a cooling rack. Enjoy!


Sunday, June 28, 2009

Care Bears Cloud Cake


One of my very first cookbooks when I was a little girl was the Care Bears Party Cook Book. It had lots of kid-friendly recipes for fun and festive treats. To this day, I still make a dessert that is based on a recipe from this cookbook. It's called Cloud Cake. I have included the original recipe and my simplified version below.

I usually make this light and easy dessert with just strawberries, but for the Fourth of July? Red White and Blue Cloud Cake just seemed right!


Cloud Cake

from the Care Bears Party Cook Book

1 pound cake
1/2 cup orange juice
1/4 cup raspberry jam or fresh berries with their juice
Frozen whipped topping or fresh whipped cream

Slice your pound cake loaf horizontally and remove the top half. Pour half of the orange juice over the bottom half of the cake. Then spread with raspberry jam or fresh berries and juice. Replace the top of the cake to make a sandwich. Pour the remaining juice over the cake. Top with whipped cream and more berries if desired.

Red, White, and Blue Cloud Cake

2 cups strawberries, hulled and sliced
1/3 cup sugar
2 cups blueberries
1 loaf-sized pound cake
Frozen whipped topping or fresh whipped cream

Combine the strawberries and the sugar in a bowl. Cover and place in the fridge for at least 30 minutes. Stir the strawberries again - they should be nice and juicy. Set aside.

Cut slices of pound cake. Top with the strawberries and juice. Top with some blueberries. Add some whipped topping, and then decorate with extra fruit on the top. Serve immediately - enjoy!!!


Friday, June 26, 2009

Slaw Dawgs!


What do you call it when you put cole slaw on a hot dog in Georgia? Well, a Slaw Dawg of course!!!

Okay, so maybe this isn't a real "recipe" but come on - the pictures alone justify this post! Plus, I wanted to be sure to share with you my favorite way to cook hot dogs in time for the Fourth of July next weekend. So here are my Slaw Dawgs!


Slaw Dawgs

4 tablespoons butter or margarine
4 all-beef hot dogs
4 hot dog buns
2 cups of prepared cole slaw
Ketchup and mustard

Melt 2 tablespoons of the butter in a large skillet over medium heat. Add the hot dogs and allow them to cook, turning occasionally until they are brown and crispy on all sides.

Remove the dogs from the pan and add the remaining 2 tablespoons of butter. When it has melted, place your hot dog buns in the pan. Allow the buns to brown, turning so that each side is crispy.

Put your hot dogs in the prepared buns, and top with slaw, ketchup, and mustard. Doesn't get much more summery than this, folks!!!

Thursday, June 25, 2009

Southern Hominy with Squash and Mushrooms


This dish was inspired by what I had on hand in my refrigerator and from a few different recipes I browsed recently online. We have so much squash these days from our own garden and from our CSA baskets, as well. But no one in our house is complaining - you've never tasted squash unless you've eaten it fresh from your garden - so sweet and fresh!

Hominy with Squash and Mushrooms

4 slices of thick-cut bacon
1 tablespoon olive oil
1 cup diced onion
2 cups sliced mushrooms
1 can hominy, drained and rinsed
2 small yellow squash, sliced into 1/4" thick half-moons
2 small zucchini squash, sliced into 1/4" thick half-moons
1 teaspoon lemon zest
2 tablespoon lemon juice
1/3 cup chicken broth
Salt and pepper to taste
Fresh chopped parsley

In a large pan, cook the bacon over medium-high heat until golden brown and slightly crispy on both sides. Remove the bacon to drain on paper towel.

Add the onion to the pan with the bacon drippings and cook for about 5 minutes, until tender. Add the mushrooms, hominy, squash, lemon zest, lemon juice and chicken broth. Continue to cook over medium-high heat for 5-6 more minutes, until all the veggies are tender.

Break the bacon into bite-sized pieces and return themn to the pan. Season the veggies with salt and pepper to taste. Serve hot and garnish with the fresh chopped parsley.

Wednesday, June 24, 2009

Georgia Peach Cobbler


Yes, dear readers, I know I just posted a recipe for peach cobbler a mere three days ago, but are you seriously complaining?? Peach cobbler is the best!! And this one is different - you'll see . . .

So this recipe comes from our across-the-street neighbor when I was growing up - my mom's friend Mary. It used to be that people thought I was crazy when I would make this recipe, but nowadays, I think there are a few similar versions floating around the internet.

Basically, you melt a stick of butter in a pan. (This is the way any good southern recipe starts, right?!?) Then you pour your batter into the melted butter and pour your peaches over the top of the batter. The best part is that you aren't supposed to stir! How easy can this get?

And the final product? Crispy butter-fried dough puffs up and bakes all around the juicy-sweet peach slices. Again, the hint of cinnamon (barely a whiff) really brings out the depth of that golden peach flavor.

Georgia Peach Cobbler
From my mom's friend Mary

4 cups fresh Georgia peaches, peeled and sliced
1/2 cup sugar
1/2 cup butter
3/4 cup flour
3/4 cup sugar
2 teaspoons baking powder
A dash of salt
3/4 cup milk
1/2 teaspoon cinnamon

Preheat oven to 350 degrees.

Combine the sliced peaches and the 1/2 cup sugar in a medium bowl. Cover and refrigerate for several hours, until the juices start to run.

Place the butter in a 9x13" baking dish. Put it in the oven for 3-4 minutes, until the butter is completely melted.

Meanwhile, stir together the flour, sugar, baking powder, and salt in a mixing bowl. Add the milk and stir just until combined.

Remove the dish with the butter from the oven. Pour the prepared batter over the butter. Do not stir!

Next, pour the peaches over the batter and butter. Do not stir!

Finally, sprinkle the cinnamon evenly over the top. Return the dish to the oven and bake for 45-50 minutes, until the batter sets and turns a golden brown on top. Serve hot with vanilla ice cream.


Tuesday, June 23, 2009

Blueberry Streusel Muffins


Growing up in Atlanta, we lived next door to a wonderful family - the Fullers. They had a son my older brother's age and a daughter my age. Their daughter and I were both blond little babies, and our moms would dress us in the same outfits from Laura Ashley, send us to ballet class together, and let us have sleepovers. We were flippin' adorable!

Our families were together so often, that we got to call Mrs. Fuller "Mom Fuller" - since she was our "other" mom. Even now that we are all grown up (well, mostly grown up!), our families remain close. So here is a wonderful recipe from my "other" mom - Mom Fuller's Blueberry Streusel Muffins!

Don't you love that blueberry running down
my oh-so retro-foil muffin liner?
Try not to drool on your keyboard, kay?

Blueberry Streusel Muffins
recipe from Mom Fuller

1/3 cup sugar
1/4 cup butter, softened
1 egg
2 1/3 cups flour
4 teaspoons baking powder
1/2 teaspoon salt
1 cup milk
1 teaspoon vanilla
1 1/2 cups blueberries

1/2 cup sugar
1/3 cup flour
1/2 teaspoon cinnamon
1/4 cup butter, softened

Preheat your oven to 375 degrees, and grease or line 18 muffin cups.

In an electric mixer bowl, cream sugar and butter until light and fluffy. Add egg and beat until well-combined.

In a seperate bowl, combine flour, baking powder and salt. Add to creamed mixture alternately with milk, stirring well after each addition.

Finally, stir in vanilla and blueberries. Spoon batter into greased or lined muffin cups, filling two-thirds of the way full.

For topping, combine the sugar, flour, and teaspoon cinnamon. Cut in the butter with a fork or pastry blender until mixture resembles crumbs. Sprinkle on top of muffin batter.

Bake at 375 degrees for 25 - 30 minutes or until golden brown. Yield ~ 18 muffins.


Sunday, June 21, 2009

Rice with Mango Chutney


There are times, dear readers, when plain white rice is perfect. But there are other times when you need something a bit more . . . special! This rice is full of flavor. It is worthy of sitting next to your very best chicken or fish recipes, colorful and delicious.

And best of all? It's extremely easy to make.

Chutney Rice Recipe
from my mom's friend Sue

2 cups white rice
1 3/4 cups water
1 3/4 cups chicken broth (or white wine for a vegetarian version)
2 tablespoons butter
Salt to taste
1/3 cup mango chutney
2-3 tablespoons chopped fresh parsley

In a large pot, combine rice, water, broth and butter. Bring the mixture to a boil, then lower the heat to a simmer. Cover and allow to cook for 20-25 minutes, until the rice is cooked through. Add salt to taste. Finally, stir in the mango chutney and the chopped parsley. Serve hot.

Friday, June 19, 2009

Proud to Be a Georgia Peach!


It's no mystery around here that I am a Georgia girl, through and through. One of the best things about being in my beautiful state at this time of year is PEACHES.

I can (and do?) eat fresh Georgia peaches morning, noon, and night when they are in season. I like them cut into juicy-tart chunks on top of my cereal in the morning, I like them sliced and peeled next to my sandwich at lunch time, I like them in my salsa with a cold drink in the afternoon, and I like them underneath a fluffy-moist, crispy-sweet biscuit crust after dinner throughout the summertime.

Throw in some blueberries if you must, but the peaches are the star of this dish! I made this one up on the fly - it's very versatile - you will fall head over heels for the subtle flavor that the honey lends to the fruit and to the crust!!


Align Center
Peach-and-Blueberry Cobbler

3 cups of fresh peaches, peeled and sliced
2 cups fresh blueberries
1 tablespoon honey (local is best!)
1 teaspoon lemon juice
1/3 cup sugar
A pinch of salt

2 cups flour
1/2 cup sugar
2 teaspoons baking powder
1/2 teaspoon salt
1/4 teaspoon cinnamon
4 tablespoons butter, cold
1 cup buttermilk
An extra drizzle of honey
An extra sprinkle of sugar

Preheat your oven to 375 degrees. Grease a deep pie dish or a 9x9 baking dish and set aside.

In a large bowl, combine the peaches, blueberries, honey, lemon juice, sugar, and salt. Set aside to let the juices get to flowin'!

In a medium bowl, whisk together the flour, sugar, baking powder, salt, and cinnamon. Using a pastry blender, cut in the cold butter until a flaky mixture forms. Pour in the buttermilk and stir just until a soft and supple dough forms.

Next, pour the fruit with all their yummy juices into your prepared baking dish. Then dollop the biscuit dough over the top by spoonfuls. Finally, use a spoon to drizzle some extra honey over the top of the dough. Sprinkle lightly with sugar, and pop it into the oven for about 30 minutes, until the crust is a deep golden brown and the fruit is bubbly. Serve hot with vanilla ice cream. Enjoy!


Thursday, June 18, 2009

Crispy Baked Chicken


I have to admit to you, dear readers, that there was a time when I was intimidated by the task of baking chicken. It seems so simple - put it in the oven until it's done, right?

But how do you know when your chicken is cooked through? Until the inside isn't pink? Until the juices run clear?

But was the inside pink to begin with? And did the juices ever NOT run clear?

I just couldn't figure it out. I either ended up with chicken that I was too scared to eat, or chicken that was too tough to eat!

Well, the best purchase I ever made was the $1.99 meat thermometer that I bought at the supermarket one day. Stick it in your chicken breasts when you think they are close to being done, and see if it registers 180 degrees. If so, then you're good to go! Juicy, tender chicken that is safe to eat.

So shell out the extra two bucks for a meat thermometer and try out this amazingly tasty chicken. Crispy on the outside, juicy on the inside - you are going to love this stuff!


Crispy Baked Chicken
inspired by Pioneer Woman

4 chicken breasts, cleaned
1 cup fat free Greek style yogurt (or any plain yogurt)
1 1/2 cups panko bread crumbs (crushed cornflakes do the trick, as well)
1/2 teaspoon garlic powder
2 teaspoons your favorite seasoning blend (Mrs. Dash, herbes de provence, cajun, whatev)
Salt and pepper to taste
4 thin tabs of butter

Preheat your oven to 375 degrees. Grease a 9x13 inch baking dish and set aside.

You can start by either marinating or simply coating your chicken in the plain yogurt. Either way works fine. In a shallow dish, combine the panko breadcrumbs with the garlic, seasoning blend, and salt and pepper. Completely coat each piece of chicken with the bread crumb mixture, and place in the baking dish, about 1 inch apart. Top each chicken breast with a thin tab of butter.

Cover with foil and bake for 50-60 minutes, until chicken is cooked through and your meat thermometer registers 180 degrees when inserted into the center of the meat. Serve immediately.


Wednesday, June 17, 2009

Sautéed Squash Medallions


Sometimes the best way to cook fresh veggies is the simplest. Just some olive oil and salt and pepper bring out the sweet and juicy flavor of fresh summer squash. Also, caramelizing veggies as you cook them - just bringing out the slightest browned color in them - will draw out their amazing natural sweetness. These simple sautéed squash medallions go down like candy, the perfect accompanimnet for a light, summery meal.


Sautéed Squash Medallions

1 tablespoon extra virgin olive oil
2 medium yellow crook-necked squash
1 medium zucchini squash
Salt and pepper to taste

Heat the olive oil in a heavy skillet over medium to medium-high heat. Meanwhile, slice up your squash and zucchini on the diagonal so that you have pretty round slices. Season with salt and pepper to taste. Place the slices in the pan in an even layer and allow them to brown for about 3-4 minutes. Turn the slices over and allow them to cook for another 2-3 minutes. Remove from the heat and serve immediately for a fresh and tasty veggie side dish.


Tuesday, June 16, 2009

Road Trip to Jekyll Island!

Dear Readers,

Thanks for hangin' in there over the past few days without your usual VV fix - I've been enjoying a little family vacation down on Jekyll Island - one of Georgia's beautiful coastal islands. We drove down there and surprised our 2-year-old and 4-year-old nephews. It was a blast.


This was my first trip to Jekyll. When I was young, my family would normally drive to Savannah, Georgia or Amelia Island in Florida during the summer - I can't believe we were missing out on this amazing place. Jekyll Island is a Georgia State Park. If you're into a laid-back, bare-bones beach scene (and I certainly am), then this is a great place to vacation.

But back to food . . . here are a few of the highlights from our road trip through Georgia!

We stopped for lunch on our way down in the town of Wrens, Georgia at an Amish restaurant called The Dutch House.


I'm here to tell ya, the Amish know what they're doing when it comes to food! Everything is fresh, from scratch, with high quality ingredients. Fried chicken, sweet potato casserole, and macaroni and cheese for me!


And a VV road trip through middle Georgia wouldn't be complete without a quick stop in Vidalia, Georgia - the sweet onion city!!


Sadly, their main street office was closed when we went by, but we peered in the windows anyway.


We also tried to stop by the Vidalia Onion Committee office to say hello to our friends there, but alas we gave up and hit the road for the beach.

Georgia shrimping season was at its peak when we arrived on the island, so there were tons of shrimp boats out and about, and lots of great meals filled with fresh local shrimp!


The island also has a neat little candy store that our nephews loooove to frequent. The Sweets Shoppe is housed in a historical building near the Jekyll Island Club, a historic Georgia resort frequented by the rich and famous during the 1890s. As you can see from the chimney, this used to be the Boiler House.


The little boys love these island-themed candies the best - they are white chocolate tinted with pastel colors and cast in the shapes of sea creatures.


And the nearby Jekyll Bookstore is home to a wide variety of cookbooks featuring recipes for Georgia coastal cuisine. It took great self-restraint on my part not to buy every book on this table:


One more store that's worth a stop is the Commissary. It features a collection of local gourmet food and gifts, including this tasty tin of cookies I bought for my parents to enjoy!

Thanks for letting me share a little bit of my journey with you. I'll be back to regular blogging tomorrow!!

Tuesday, June 9, 2009

Granny's Blackberry Pie


For years now, I've heard stories of my husband's grandmother, who passed away shortly before he and I met. Granny is a legendary cook - I wish I could find her secret recipe book. Although most of them were probably never written down.

One of her dishes that I've been wanting to re-create is her Blackberry Pie. My husband, who raves about this concoction every time a blackberry pops into our lives, was actually not very helpful in describing the dish to me. So I went to his parents. Granny taught my mother-in-law how to make many of her signature recipes (including her biscuits, which is another story altogether). So I played 20 questions with my extremely patient and helpful mother-in-law before attempting to make Granny's Blackberry Pie.

So here it is: my humble attempt to recreate a dish that my husband ate at his Granny's house when he was a little boy. I think my version doesn't have quite as much sugar as Granny's did. She would also strain the blackberries so that just the juice remained, but I kept the berries whole to add some more bulk to the filling. The crust is actually my Nanny's recipe, and I think I took some creative liberties in making the crust a bit thicker around the edges - Granny apparently just made a square and let the juices bubble up around the edges. The one thing they all remembered quite clearly, though, was the generous coating of cinnamon sugar on top - an extra little sumthin'-sumthin' that, in my humble opinion, make this dish a truly memorable one!

Granny's Blackberry Pie
from hubby's Granny

4 cups fresh blackberries
1 cup sugar
1/3 cup water
A pinch of salt

1 cup flour
1/2 teaspoon salt
1 1/2 teaspoons baking powder
6 tablespoons shortening
1 ounce (1/8 cup) ice cold water

1 egg, lightly beaten
3 tablespoons sugar
1/4 teaspoon cinnamon

Preheat your oven to 375 degrees. Grease a 9x9-inch baking dish and set aside.

In a heavy medium saucepan, combine the blackberries, sugar, water, and salt. Cook over medium heat until the mixture comes to a boil. Then reduce to a simmer, and smash up the berries using the back of a spoon or other utensil. Continue to simmer for about 30 minutes, until the mixture begins to thicken into a thin syrup. Pour the berry mixture into the prepared dish.

In a medium bowl, combine the flour, baking powder, and salt. Cut in the shortening with a pastry blender until the mixture is crumbly and flaky.


Make a well in the center and pour in the ice water. Stir lightly with a fork until a loose dough forms. Then get in there with your hands to make the dough into a ball. If the dough won't come together, then add a few more drops of cold water.

Turn out the dough onto a lightly floured surface and roll it out into a 10x10-inch square. It doesn't have to be perfect, just big enough to drape over the dish with the berries. Trim the edges, and pinch them to the edge of the dish.


Next, brush the egg over the crust. Combine the cinnamon and sugar in a small bowl and sprinkle over the top. Bake for about 25 minutes, until the crust is golden brown and the berries are nice and bubbly. Allow to cool for 10 minutes before serving.


Monday, June 8, 2009

Vidalia Victuals WINNER!

I'm happy to announce the winner,
selected by you dear readers,
of the first annual Vidalia Victuals Contest.

Cooks Like a Champion
Caramelized Vidalia Onion and Goat Cheese Grits!!

Congratulations, Courtney!


Courtney's recipe got 217 out of the 719 votes cast in the contest, making her the winner of our Vidalia Onion Prize Package!!!

I must say, the hubs and I really loved this recipe. We even ate the leftover grits underneath some grilled shrimp for dinner the next night, with some corn on the cob on the side. It was pretty freaking awesome . . .


To see the results of all our wonderful entries, please click here.

I'd like to thank everyone who submitted recipes, who drooled over our finalists' creations, and who voted in this fun contest.

I also appreciate the support received from the Vidalia Onion Committee in beefing up our prize package with some fun Vidalia items! I encourage you all to check out the Sweet Times Recipe Contest being hosted by the Vidalia Onion Committee. Entries are being accepted through August 14, 2009, and they are giving away some big cash prizes!

Sunday, June 7, 2009

Yellow Summer Squash Casserole


Yellow Summer Squash Casserole
from my mom

3 pounds yellow summer squash
1/2 cup chopped onions
2 eggs
2 tablespoons butter
1 tablespoon sugar
1 teaspoon salt
1/2 teaspoon black pepper
2 more tablespoons butter
about 1/2 cup crushed crackers or bread crumbs

Wash and slice up the squash. Boil or steam until tender, drain thoroughly, then mash.

Add the onion, eggs, butter, sugar, salt, and pepper to the squash. Pour mixture into a greased 9x13-inch baking dish. Melt the remaining two tablespoons of butter, and then spread it over the top of the squash. Sprinkle with crackers or bread crumbs.


Bake in 375 degree oven for approximately 1 hour, or until brown on top. Let the casserole cool for about 10 minutes before serving.

Saturday, June 6, 2009

Spicy Southwestern Roasted Potatoes


Here's a hot and spicy side to go with your burgers. This one was inspired by Hayley, too!

Spicy Southwestern Roasted Potatoes

4-6 medium-sized red potatoes, cut into roughly equal sized wedges
1-2 tablespoons vegetable oil
1/4 teaspoon ground cayenne pepper
1/2 teaspoon garlic powder
1/2 teaspoon paprika
Salt and pepper to taste

Preheat your oven to 400 degrees.

In a medium bowl, toss the potatoes with the vegetable oil and the spices until they are completely coated. Add salt and pepper to taste. Spread in an even layer on a baking sheet. Bake for 30-40 minutes, or until golden brown and slightly crispy on the outside. Serve warm.


Made by Lena