Showing posts with label Frosting. Show all posts

Thursday, August 6, 2009

Big Brother's Birthday Cake


My big brother. Smart, handsome, dentist, bachelor, and now 31 years old. If this sounds like a personals ad, it should. Do you have a lovely lady in your life? Single, southern, conservative, sweet? Perhaps we need to set them up?

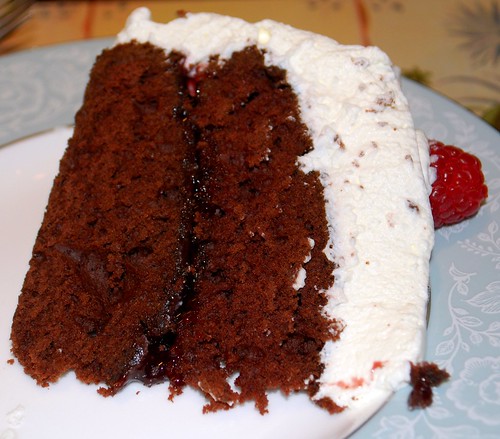
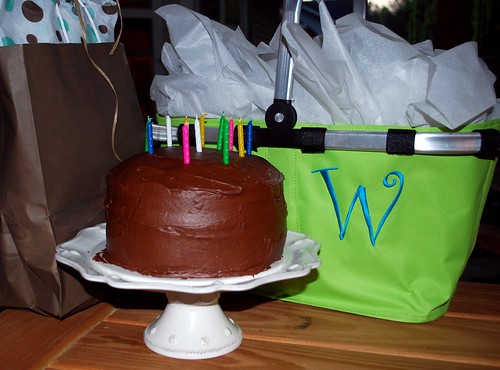
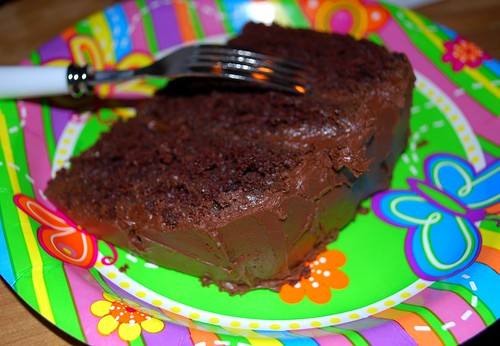
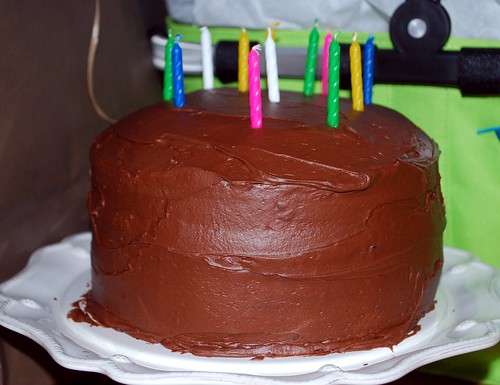
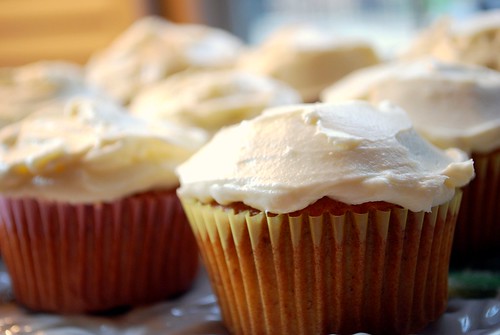
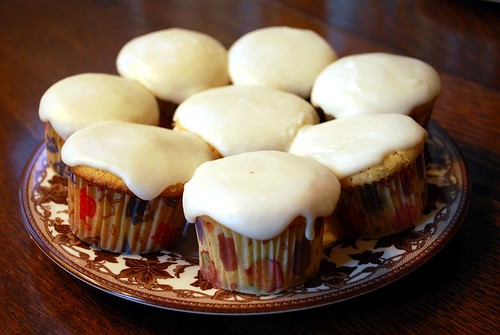
Hahahaha, this past weekend was my big brother's birthday. Every year, I make him the same cake. White cake with lemon curd filling and white mountain frosting. And every year, I tell him what a pain in the patootie it is to make this thing. And every year, I take that first bite of cake and remember, all over again, that it is completely worth the effort to make this masterpiece of a cake!!! Tender, fluffy white cake . . . tangy, tart lemon filling . . . light, melt-in-your-mouth frosting . . . what more could a boy want?!

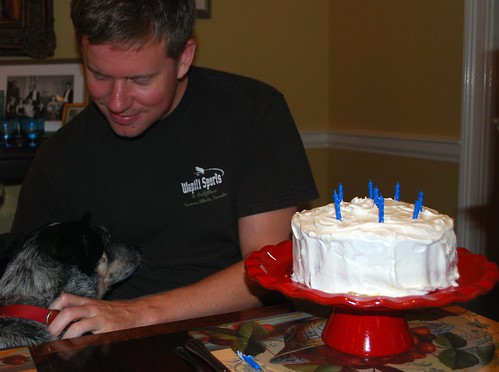
Here's a cute pic of big bro with his sweet Australian Cattle Dog - Scout! She is the only lady in his life at the moment . . .


Big Brother's Birthday Cake

Cake
2 cups cake flour
1 tablespoon baking powder
1/2 teaspoon salt
2 tablespoons unsalted butter
1 2/3 cups sugar
1 cup milk
5 egg whites

Lemon Curd
1 1/2 cups sugar
1/4 cup cornstarch
1/4 teaspoon salt
1 1/2 cup cold water
6 egg yolks (save 2 whites for the icing!)
2 teaspoons grated lemon peel
1/2 cup fresh lemon juice
3 tablespoons unsalted butter

White Mountain Frosting
1/4 cup light corn syrup
1/2 cup sugar
2 tablespoons water
2 egg whites
1 teaspoons vanilla

For the cake:
Preheat your oven to 350 degrees. Generously grease and flour two 9-inch round pans with butter and flour (seriously, don't skip the flour!).

Sift together the dry ingredients and set aside.

Beat the butter in with an electric mixer. Add the sugar and the vanilla, and continue to beat until fluffy. Gradually add the dry ingredients and the milk, alternately, starting and ending with the flour.

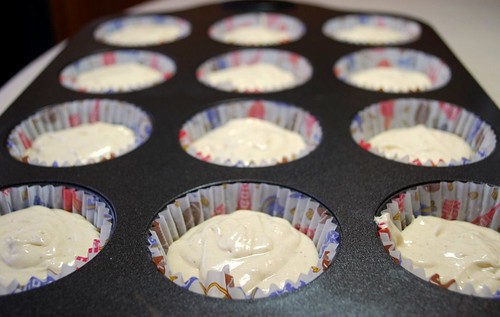
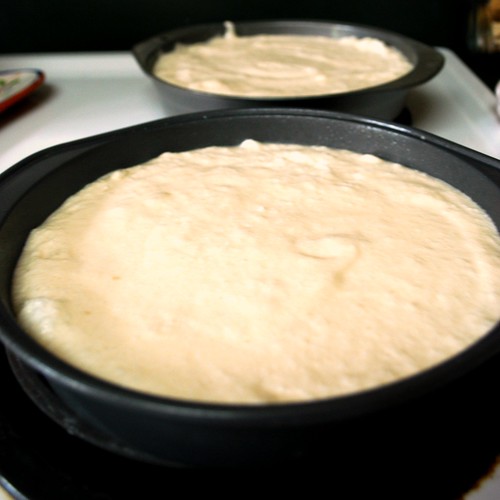
Beat the egg whites until stiff peaks form. Gently fold into the batter. Divide the batter evenly between the two prepared pans, like so . . .


Then bake for 25-30 minutes, until cake springs back when gently touched near the center.

For the lemon curd:
Combine the sugar, cornstarch, and salt in a medium saucepan. Add the water and whisk in the egg yolks, lemon peel, and lemon juice. Cook over medium heat until thick and bubbly, boiling the mixture for one minute. Remove from the heat and stir in the butter. Strain the mixture and cool to room temperature.

For the frosting:
In a small saucepan, combine the corn syrup, sugar, and water. Cover and apply medium heat until the mixture reaches a rolling boil. Do not stir, but uncover and continue to boil until the mixture reaches 242 degrees on a candy thermometer and/or the mixture spools 6-8-inch threads when drizzled from a spoon.

Meanwhile, whip the egg whites until stiff peaks form. Very gradually stream the hot sugar mixture into the egg whites, beating constantly, until thick and glossy. Add the vanilla and continue to beat until desired consistency is reached.

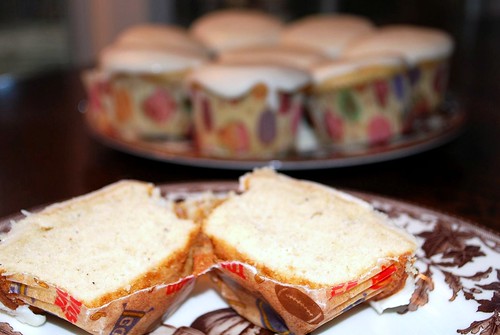
To assemble the cake, put half of the lemon curd over the first layer. Top with the second layer, and ice the entire outside with the frosting. Serve with the extra lemon curd on the side.

Don't you just love how shiny and gorgeous the icing is?


Sources: The cake and curd recipes come from my sister-in-law. The frosting is from my tried and true, vintage Betty Crocker cookbook.

Thursday, June 4, 2009

Cute Carrot Cup Cakes


I love my mom. So when she told me she didn't need me to bring dessert for her Mother's Day brunch last month, of course I didn't believe her. Instead, I surprised her with one of our long-time favorite recipes, in cupcake form!

This is a fabulously moist and fluffy carrot cake - perfect for a brunch, for Easter, for Mother's Day, or for any day! These tender little cakes will melt in your mouth - especially when you top them with classic cream cheese frosting.

Classic Carrot Cake
from my mom's friend Sue

1 1/3 cups oil
2 cups sugar
4 eggs
2 cups flour
2 teaspoons baking soda
2 teaspoons cinnamon
1/2 teaspoon salt
3 cups finely grated carrots (3-4 large carrots)

Preheat your oven to 350 degrees. Grease a 9x13" pan or 3 round layer pans or line 24 cupcake tins.

Blend oil and sugar. Then beat in eggs one at a time. Sift in the dry ingredients. Gently fold in the carrots. Pour batter into your prepared pans. For 9x13" pan, bake for 1 hour and 15 minutes. For layers, bake 18-25 minutes. For cupcakes, bake 15-18 minutes. Allow to cool completely on racks before frosting.

Cream Cheese Frosting

1 stick butter
1 8-ounce package cream cheese
1 box powdered sugar
2 teaspoons vanilla

Cream all ingredients together until smooth. Ice completely cooled cakes as desired.


Pictures taken by my super-cute mom with her brand new camera,
a present from dad on Mother's Day!

Wednesday, June 3, 2009

Dad's Birthday Cake


My dad loves chocolate. My dad loves whipped cream. My dad's birthday cake for years and years has been a classic chocolate cake iced with fresh, unsweetened whipped cream. This year, though, he had a brilliant idea. Why not add a raspberry filling in the middle? Brilliant!!

The whole family raved about this cake. It was such a festive birthday cake, super easy, and a really great combination of raspberry, cream, and fluffy moist chocolate cake!


Raspberries 'n' Cream Chocolate Cake
based on my favorite Betty Crocker's Cookbook Chocolate Cake recipe

2 1/4 cups flour
1 2/3 cups sugar
2/3 cup cocoa
1 1/4 teaspoons baking soda
1 teaspoon salt
1/4 teaspoon baking powder
1 1/4 cups water
1/4 cup shortening
2 eggs
1 teaspoon vanilla
1/4 cup seedless raspberry preserves
3 cups whipping cream
8-10 fresh raspberries

Heat oven to 350 degrees and grease 2 round 9" cake pans.

Measure all ingredients into large mixer bowl. Blend 1/2 minute on low speed, scraping bowl constantly. Beat 3 minutes high speed, scraping bowl occasionally. Pour batter into cupcake tins until 2/3 full. Bake for 23-35 minutes. Cool on racks.

Whip the cream until it reaches a good spreading consistency. Spread the raspberry preserves over the top of the first layer of cake. Gently place the next layer on top. Ice the outside of the cake with the plain whipped cream. Decorate the top of the cake with the fresh berries, and serve immediately. Enjoy!


Sunday, May 3, 2009

Perfectly Chocolate Birthday Cake


For a dear friend's birthday cake, I decided to try out the Hershey's Perfectly Chocolate Cake recipe. I had been hearing a lot of buzz about it online, and wanted to see if it lived up to the hype. It certainly did! This is a great, moist, and easy-to-make chocolate cake. And I especially liked the chocolate frosting.

The big question: has this recipe replaced my favorite, go-to. basic chocolate cake recipe? Hmmm. Almost. I still think my old-time fav is super-easy, fluffier, and more chocolaty . . . so it's not going anywhere!

That said, this is a great recipe that definitely deserves its place in the rotation!


Hershey's Perfectly Chocolate Cake
from Hershey's

2 cups sugar
1 3/4 cups all-purpose flour
3/4 cup cocoa
1 1/2 teaspoons baking powder
1 teaspoon salt
2 eggs
1 cup whole milk
1/2 cup vegeetable oil
2 teaspoons vanilla
1 cup boiling water

Preheat your oven to 350°F. Grease three 8-inch round baking pans.

Mix together the sugar, flour, cocoa, baking powder, baking soda and salt in large mixing bowl. Add the eggs, milk, oil and vanilla; beat on medium speed of mixer 2 minutes. Stir in boiling water (batter will be thin). Pour batter into prepared pans.

Bake for 25 to 30 minutes or until wooden pick inserted in center comes out clean. Cool 10 minutes; remove from pans to wire racks. Cool completely before frosting (see below).


Perfectly Chocolate Frosting
also from Hershey's

1/2 cup butter
2/3 cup cocoa
3 cups powdered sugar
1/3 cup whole milk
1 teaspoon vanilla extract

Melt the butter in a small saucepan, stirring in cocoa. Alternately add powdered sugar and milk, beating with an electric mixer until the frosting reaches spreading consistency. Stir in vanilla. Frost your cake as desired.


Friday, April 10, 2009

Summary of My Day


Ever wonder what it's like to have 6 dozen mini-cupcakes on your kitchen counter? In addition to about 4 dozen cookies, 2 dozen mini lemon meringue pies, and 8 dozen mini-muffins?

Yeah, me neither!

Here is the recipe for the chocolate cupcakes
. Here is the recipe for the icing. They sure do taste good, but I sure am tired now.


Please support tomorrow's bake sale here. Thanks, and goodnight!

Tuesday, March 10, 2009

Banana Cupcakes with Classic Cream Cheese Frosting


I'm going to be completely honest with you, dear readers. I love to bake. But I also love to bake quickly. Nanny can tell you plenty of stories about how fast I can throw a pie together. So it makes perfect sense that some of my favorite recipes are what I like to call "dump and mix" recipes. Basically, the directions on these recipes read something like this:

"Preheat your oven and grease the pan. Dump all the ingredients into a bowl and mix well. Bake for 30 minutes and enjoy."

With recipes as simple and quick as this, I just don't see how you can justify using store-bought cake mixes. Okay, I admit that I'll use a mix when I'm in a pinch - but I usually goose it up à la Cake Mix Doctor. But I very much prefer baking from scratch, and I honestly believe it doesn't have to be any harder than baking a cake from a mix!

Confession: I wrote an "argumentative essay" in my 8th grade English class. What topic did I choose? Reasons why people should bake from scratch and not use store-bought mixes. When I presented my topic to my teacher, she was very skeptical. But I ended up with an A+ on that masterpiece.

This is one of those recipes that goes right to the heart of my position on this issue. This dump-n-mix recipe for banana cake is incredibly simple, super-quick, and outrageously moist and flavorful. I like to top it off with a classic cream cheese frosting. I usually make this as a layer-cake, but this time I decided to go for some cute cupcakes.

On an unrelated side-note, check out the photo below, in which my dog Sophie is making another special Vintage Victuals appearance. Even from outside the window, she knows there are good things going on in the kitchen - especially when I get the camera out!


Banana Cupcakes

Adapted from my vintage Betty Crocker cookbook

2 1/4 cups cake flour
1 2/3 cups sugar
1 1/4 teaspoons baking soda
1 teaspoon salt
2/3 cup shortening
2/3 cup buttermilk
3 eggs
1 1/2 cups mashed ripe bananas

Preheat your oven to 350 degrees. Grease your desired baking pan: either a 13x9x2 inch pan, two 9-inch round layer pans, three 8-inch round layer pans. Or line cupcake tins with liners.

Measure all ingredients into a large electric mixer bowl. Blend for 30 seconds on low speed, scraping down the sides of the bowl. Next, beat for three minutes on high speed. Pour the batter evenly into the prepared pans, or fill cupcake tins about 2/3 of the way full.

Bake oblong 45-50 minutes, layers 35-40 minutes, cupcakes 20-25 minutes. Cool completely on racks.


Classic Cream Cheese Frosting
1 8-ounce package of regular cream cheese
1/2 cup (1 stick) butter, softened
2 cups powdered sugar
1 teaspoon vanilla

Blend together cream cheese and butter. With mixer on low speed, gradually add the powdered sugar until completely incorporated. Add the vanilla, and blend. You may add extra sugar or add a little bit of milk to thicken or thin the frosting to the desired consistency.

Friday, February 20, 2009

Moon-Washed Apples of Wonder


This is the most wonderful, moist, dense, and deliciously cozy cake you have EVER put in your mouth. The perfect end to a hearty winter meal.

This recipe comes from my mom's sister - my sweet Auntie Heather. She is another one of the many great cooks in my family, so watch for more recipes from her in the future! You can tell how much we love this recipe by how worn and stained the recipe card looks.

Auntie Heather's Apple Cake
1 1/2 cup vegetable oil
3 eggs
1 teaspoon salt
1 teaspoon baking soda
2 teaspoons vanilla extract
2 cups sugar
3 cups flour
3 large, tart cooking apples - peeled, cored, and cut into chunks
1 cup pecans, chopped (optional)

Preheat oven to 325 degrees. Grease and flour a large bundt pan and set aside. In a large electric mixer bowl, beat vegetable oil and eggs on high speed for 3 minutes. Add the salt, baking soda, vanilla, sugar, and flour, and blend on low speed until incorporated. With a wooden spoon, fold in apples and pecans. Pour batter into prepared pan and bake for 1 hour and 20 minutes, or until toothpick inserted into center of cake comes out clean. Cool for 10 minutes in the pan, then turn out onto a cooling rack and allow to cool completely.

Brown Sugar Glaze
1 stick of butter
1/2 cup light brown sugar
1/2 cup dark brown sugar
2 tablespoons milk

Put all ingredients in a small saucepan, and place over medium-low heat, stirring until melted. Increase the heat and continue to cook until mixture reaches a boil. Allow to boil for one minute. Remove from heat and allow the glaze to cool for 20 minutes so that it can thicken. Then spoon it over the cake so that it drips lavishly down the sides.

Tuesday, February 17, 2009

My Birthday Cake


Well, dear readers, today is my birthday. So last night, I found myself making my very favorite double-chocolate cake. We'll have dinner tonight at my parents' house and have this as my birthday cake for dessert.

I know what you're thinking: "What?! They make you do your own birthday cake?!"

Answer: "Heck, I love making my own birthday cake!"

My mom or Nanny (her mom) will always offer, but for someone like me who loves to bake, it's not a chore to make your own birthday cake - it's fun!!! Plus, this is my very favorite cake to make - it's easy, delicious, and super-chocolaty! The cake is light and fluffy, and the frosting literally melts in your mouth. What more could a birthday girl ask for?


Cocoa Fudge Cake

2 cups cake flour or 1 2/3 cups all-purposes flour
1 1/2 cups sugar
2/3 cup cocoa
1 1/2 teaspoons baking soda
1 teaspoon salt
1 1/2 cups buttermilk
1/2 cup shortening
2 eggs
1 teaspoon vanilla

Preheat the oven to 350 degrees. Spray baking pan, 13x9x2 inches, or 2 round 9" layer pans, 3 round 8" layer pans (as pictured here), or cupcake tins. Measure all of the ingredients into large electric mixer bowl. Blend for 30 seconds, scraping down the sides of the bowl constantly. Beat for 3 minutes on high speed, scraping bowl down when needed. Pour batter evenly into pan(s).


Bake oblong 35-40 minutes, layers 30-35 minutes, cupcakes 25-30 minutes. Or until wooden toothpick inserted into the center comes out clean. Cool completely before frosting.


Now for the frosting!


Laure's Buttery Chocolate Frosting

1 stick of butter, softened
4 tablespoons half 'n' half
1 teaspoon vanilla
3 cups confectioner's sugar
4 tablespoons unsweetened cocoa powder

In a small electric mixing bowl, beat butter, half 'n' half, and vanilla until creamy. Gradually add the confectioner's sugar, beating until light and fluffy. Add cocoa powder and blend until incorporated. Frost your cooled cakes as desired.


Monday, February 2, 2009

The Joining of Two of My Passions . . .

As most of you know, dear readers, I live in Georgia. I'm not sure if you've heard, but there's a little bit of a craze down here over a game called football. I grew up with two brothers, so it was pretty much a foregone conclusion that I would be a sports fan. I have a special place in my heart for one team in particular.

So on occasion I like to bring two of the great passions in my life together - football and baking - and make football cookies. So I wanted to share with my readers a collection of tips on how to make great football cookies for your next tailgate or Superbowl party.

First of all, here is my recipe for super-simple icing for decorating cookies:

Super-Simple Cookie-Decorating Icing
1 cup icing sugar
1 tablespoon milk
1 drop vanilla

Blend ingredients in a small bowl with a fork. If icing is too thick, add a drop of milk until it reaches the desired consistency. If it is too thin, add extra icing sugar. A drop of food coloring may be added to create any color you wish!

Spoon the icing into a ziplock bag. Close the bag securely. Using a sharp pair of scissors, snip of a very small bottom corner of the bag. Pipe the icing through the corner onto the cookies. Allow the icing to set before stacking your cookies.


Second, let's talk about what cookie equipment you will need. If you don't have a football cookie cutter, then DON'T WORRY! We can't all be as lucky as me and have a set of 101 cookie cutters. In fact, I accidentally left mine behind when I went to my parents' house to make these this year, and they ended up turning out perfectly even though I just used a sharp knife to cut out the shapes.

And thirdly, let's talk cookie recipes. In the past, I've made football cookies just by using my football cookie cutter with my regular sugar cookie recipe. Then I iced them with chocolate frosting and drew on the laces with some plain white icing. But that was sort of a lot of different flavors, and I'm not a huge fan of chocolate icing on sugar cookies, so the search continued.

Recently, I discovered this wonderful recipe for Brownie Roll-Out Cookies from Smitten Kitchen's blog. I knew immediately I'd found a new recipe for my football cookies! No need for chocolate icing, just draw on the laces like so . . .


They turned out GREAT and were a big hit at our little Superbowl gathering.

Next year, I think I'll try making gingerbread football cookies - they are the perfect pigskin color!

Everything Old Is New Again!


This wonderful treat came about because I had some eggnog left over from Christmas that was due to expire at the end of January, and I needed a way to use it up fast! After seeking a little bit of inspiration online, I dove into my old cookbooks and found a great Betty Crocker recipe for eggnog cake. It uses as its base this wonderful yellow cake recipe:

Starlight Yellow Cake


2 cups all purpose flour
1½ cups sugar
3½ teaspoons baking powder
1 teaspoon salt
½ cup shortening (half margarine or butter, softened, if desired)
1 cup milk
1 teaspoon vanilla
3 eggs

Heat oven to 350 degrees. Grease and flour 2 round layer pans or a 9x13 pan. Beat all ingredients in large mixer bowl on low speed, scraping bowl constantly, for 30 seconds. Then, beat on high speed, scraping bowl frequently, for about 3 minutes. Pour into pan(s). Bake until wooden pick inserted in center comes out clean, 9x13-40 to 45 minutes, layers-30 to 35 minutes.

I have used this recipe countless times as a basic yellow cake. The Eggnog variation of Betty Crocker's recipe instructs that you add 1 teaspoon of nutmeg, 1/4 teaspoon of ginger, and a teaspoon of rum flavoring to the recipe.

Based on this information, here's what I came up with! My special Eggnog Cupcakes!!!


Eggnog Cupcakes
2 cups all purpose flour
1½ cups sugar
3½ teaspoons baking powder
1 teaspoon salt
½ cup shortening (half margarine or butter, softened, if desired)
1 cup eggnog
3 tablespoons spiced rum
1 teaspoon nutmeg
1/4 teaspoon ginger
1 teaspoon vanilla
3 eggs

Heat oven to 350 degrees. Line cupcake tins with your choice of liners (I used some of my football cupcake liners since it was close to the Superbowl), or grease with cooking spray. Set aside.

Beat all ingredients in large mixer bowl on low speed, scraping bowl constantly, for 30 seconds. Then, beat on high speed, scraping bowl frequently, for about 3 minutes. Fill the cup cake tins about 2/3 of the way full with batter.


Bake until wooden pick inserted in center of cupcake comes out clean, about 20-24 minutes.


So then I had to come up with a nice frosting for these sweet-smelling little babies. I've been making up frosting recipes since I was a little girl, and here's what I came up with this time:

Spiced Rum Frosting
1 stick salted butter, softened
1 package confectioner's sugar
1/4 cup heavy cream
1 teaspoon vanilla
4 tablespoons spiced rum
1/2 teaspoon nutmeg

Blend all ingredients together until smooth and creamy. Then, frost your cupcakes! I also added a sprinkle of nutmeg on top of the frosting, just for dramatic effect. I added a bit of extra cream to make the icing nice and gooey - almost like a very thick, luxurious glaze.

Tuesday, January 6, 2009

Gather 'round the campfire


The idea for these cute little S'more Cupcakes came to me from my friend Ashley of HauteCakes - you should check out her website, she makes some fabu cupcakes!

I made these for some of our friends who have young kids, and they LOVED them. If it's too rainy or cold to make real s'mores over a campfire, then these cupcakes definitely hit the spot. The icing is to die for - like a fluffy buttery melt-in-your-mouth marshmallow.

It was also a good chance for me to check out Martha Stewart's One-Bowl Chocolate Cake recipe. It was super easy (especially considering it came from Martha) and tasted wonderful. It will definitely be in my normal rotation from now on.

I apologize for the sub-par photo quality - I'm hunting down my USB cord for my camera, so I took these with an older point and shoot.


S'more Cupcakes

Cupcakes: Martha Stewart's One-Bowl Chocolate Cake

1 1/2 cups unsweetened cocoa powder
3 cups all-purpose flour
3 cups sugar
1 tablespoon baking soda
1 1/2 teaspoons baking powder
1 1/2 teaspoons salt
3 large eggs
1 1/2 cups buttermilk
3/4 cup vegetable oil
1 1/2 teaspoons pure vanilla extract

Preheat oven to 350 degrees. Place cupcake liners in each tin, or simply grease with cooking spray.


Into the bowl of an electric mixer fitted with the paddle attachment, sift cocoa, flour, sugar, baking soda, baking powder, and salt. With the mixer on low, stir in eggs, 1 1/2 cups warm water, buttermilk, vegetable oil, and vanilla until smooth, about 3 minutes.


Divide batter among prepared pans. Bake, rotating once, until tester inserted in center of cupcake comes out clean, 20 to 25 minutes, depending on the size of your cupcake tins.


Let cupcakes cool in pans on a wire rack for 20 minutes, the
n remove from tins and allow to cool completely on wire rack. Makes about 24 cupcakes.

Marshmallow Frosting:
1 7-ounce jar marshmallow cream
1/2 cup butter, softened
2 cups confectioner's sugar
1 teaspoon vanilla extract
Graham Crackers, crushed
Mini chocolate bars (i.e. Hershey's)

With an electric mixer, blend marshmallow and butter until creamed. Gradually add confectioner's sugar until desired consistency and sweetness is reached. (I think I only used about 1 1/2 cups.) Add vanilla extract, and blend well.

Ice your cupcakes with the marshmallow frosting. I used a ziplock back with a corner snipped off to pipe the icing on, which made it super easy. Sprinkle with graham cracker crumbs and garnish with a miniature chocolate bar.

Sunday, December 7, 2008

Winter Wonderland Cupcakes

Here are some Winter Wonderland Cupcakes that I came up with for my husband. He loooves peppermint and chocolate, so what could be better than combining these flavors in a scrumptious cupcake???

As a base, I started with one of my most tried-and-true, easy, fail-safe chocolate cake recipes. It's from my mom's vintage Betty Crocker cookbook from the 60s.

Black Midnight Cake (from Betty Crocker's Cookbook)
2 1/4 cups flour
1 2/3 cups sugar
2/3 cup cocoa
1 1/4 teaspoons baking soda
1 teaspoon salt
1/4 teaspoon baking powder
1 1/4 cups water
1/4 cup shortening
2 eggs
1 teaspoon vanilla

Heat oven to 350 degrees and prepare cupcake pan with liners or grease. Measure all ingredients into large mixer bowl. Blend 1/2 minute on low speed, scraping bowl constantly. Beat 3 minutes high speed, scraping bowl occasionally. Pour batter into cupcake tins until 2/3 full. Bake for 20 minutes. Cool on racks.

Then, I took my trusty cream cheese frosting recipe, and made it wintry with some peppermint extract.

Peppermint Cream Cheese Icing

1/2 cup butter (1 stick)
1 (8-ounce) block cream cheese
1 box confectioners' sugar
1 teaspoon vanilla
1 teaspoon peppermint extract (or to taste)
Blend butter and cream cheese in small mixing bowl. Gradually add confectioners' sugar until desired consistency is reached. Add vanilla and peppermint, and mix well.

I took half of the icing and put it in a ziplock bag. Then I added red food coloring (a few drops) to the remaining half of the icing, mixed well, and put it into a ziplock bag. Then, I cut the corner off of the bags to pipe the icing onto the cupcakes, placing alternating stripes in curved strokes. Then I finished them off by swirling the icing with a knife to create a peppermint-candy effect.


They turned out beautiful, and soooo yummy! The moist and tender chocolate cake complimented the creamy zesty icing so well!!
 

Made by Lena