Tuesday, March 31, 2009

Kreativ Bloggers


Recently, my friend over at Mrs. Southern Belle tagged me for the Kreativ Blogger Award! I was so touched and honored - I love it when bloggers can cross genres and recognize all sorts of creativity and inspiration. Thanks Mrs. Southern Belle!!!

Here are the award rules: List 7 things you love, and then pass on to 7 bloggers that you love. Be sure to tag them to let them know that they won!

I love . . .
1. . . . finding creative inspiration in my friends and my everyday life.
2. . . . cooking and baking with organic ingredients.
3. . . . learning something new every single day.
4. . . . my incredibly supportive husband, who says he loves every dish I make.
5. . . . my mom and my grandmother, who taught me how to bake.
6. . . . my dad who makes the best chocolate chip cookies of all time.
7. . . . my brothers, who have always been there for me when I needed someone to lick the cream cheese icing off of the beaters.

I tag . . .
Brown Dog Boutique - custom stationary, treat-kits, and other tips for dog lovers
My Bottle's Up! - a real-life, touching, and hilarious story of motherhood
O'Shea Designs - her hand-made greeting cards are gorgeous
Deals, Steals, and Heels - my shopping guru always has creative ideas
Good Things Catered - she may be on hiatus for lent, but she still rocks!
HauteCakes - order some designer cupcakes, serving greater Atlanta
Life Chef's Food for Life - a fellow Atlanta food blogger, very cool

Great American Bake Sale


Vintage Victuals is proud to be participating in Share Our Strength's Great American Bake Sale!

We'll be participating in a bake sale being held on
Saturday, April 11, 2009
from 11 AM to 2 PM
in Jefferson, Georgia.

The City of Jefferson hosts a HUGE Egg Hunt that day hosting kids from all over Northeast Georgia. We will be set up right next to the festivities. (Heaven forbid any child go without a sugar high on Easter weekend, right?)

Proceeds from the Great American Bake Sale go directly to grants for organizations that feed hungry children in after-school and summer programs, when they may not be able to get three square meals a day. We are working in connection with the Jackson County Boys and Girls Club to ensure that the money raised in our community will go to our neighbors in need.

So, local readers, please email jeffersonbakesale@gmail.com if you would like to participate in this great event! And check out our team's website here for more of the nitty gritties!

And far-away readers, never fear because you can participate, too! Please consider donating to our group on our team's website or think about hosting your own bake sale! Click on the banner at the top of this post to learn more about how you can get involved with this great project.

I will be doing a BIG round-up post here on VV with pictures from the bake sale, plus recipes for those contributors who wish to share their treats with my readers!

Finally, I ask that if you are a regular reader who wants to suggest a great bake sale recipe, please post a link to the recipe in a comment on this post!

Every little thing we do has an effect on others, so take just a moment to reach out and help stop hunger for the children in our communities. Thank you for all your love and support!

Monday, March 30, 2009

Dijonnaise Never Looked So Good


This is one of my mom's best dishes. The Creamy Dijon Sauce compliments the tender, juicy pork perfectly. Pork loins have been on sale a lot lately at the grocery store, so I got the chance to make it for myself this week. Mom usually serves this dish with mashed potatoes - so that we can drizzle some extra dijon sauce on top of them! This leftovers are amazing in a sandwich, too.


Roasted Pork Tenderloin with Creamy Dijon Sauce


1/4 cup Dijonnaise spread
1 teaspoon dry mustard
1/4 teaspoon dried minced onion seasoning
1 teaspoon garlic, minced or grated
3 tablespoons olive oil
1 fresh pork tenderloin
Salt and pepper, to taste
1/4 cup Dijonnaise spread
1 teaspoon dry mustard
1/4 teaspoon dried minced onion seasoning
1/2 cup half-n-half
2 tablespoons more Dijonnaise spread

Preheat the oven to 425 degrees.

In a small bowl, mix together the Dijonnaise, the dry mustard, the onion, and the garlic. The mixture should be a bit thick. Set it aside.

In a large dutch oven-style baking dish, measure the olive oil and heat it over medium-high heat. Generously season the pork loin with salt and pepper on all sides. Using metal tongs, brown the pork in the olive oil until it is nice and caramelized on all sides. At this point, get your dijon mixture and spoon it all over the pork loin, applying it on all sides.

Next, send the whole dish into the oven to roast in the oven for about 15-20 minutes depending on the thickness of your cut). Remove the pork from the oven when a meat thermometer inserted into the center of the meat reaches 145 degrees (for medium done-ness). Remove the meat from the dish and allow it to rest for about 10 minutes.

Meanwhile, return the dutch oven to the stove. Add the half and half, deglazing the pan (i.e. scraping the brown bits off the bottom - they hold all the flavor!). Stir in the extra 2 tablespoons of Dijonnaise and warm the sauce to a simmer over low to medium-low heat, stirring occasionally, for about 10 minutes.

Next, slice the rested tenderloin into thick slices. Arrange the meat on a platter, and drizzle the dijon sauce over every piece. Serve immediately, and enjoy!


Sunday, March 29, 2009

Sausage-Stuffed Shroomers


Here is the final recipe from our wine tasting - an appetizer of sausage stuffed mushrooms - the perfect bite-sized taste to accompany our fruity and delicious Barriosa Sombrero Rojo Rioja wine. Our guests are still raving about these mushrooms over a week later - I call that a successful dish!


Sausage Stuffed Mushrooms

3 pints baby bella mushrooms, cleaned with the stems removed
1 lb. chicken or turkey sausage, sweet Italian is great, but almost any flavor would work (We used a red wine and cheese variety from Trader Joes here.)
2/3 cup plain breadcrumbs
2 eggs, lightly beaten
1/4 cup parmigiano regiano cheese, grated (plus extra for sprinkling)
1/4 cup minced onion
1/4 teaspoon garlic powder
1/4 teaspoon fresh ground black pepper
2-3 tablespoons fresh chopped parsley

Preheat a heavy skillet over medium heat. Meanwhile, remove the casings from the sausages and put the meat in the skillet. Brown the sausage until cooked through, using a spatula to break apart any pieces. Remove from heat and allow to cool.

Meanwhile, preheat your oven to 375 degrees and grease a large baking sheet. Arrange the mushrooms cap-side-down on the sheet and set aside.

In a medium bowl, combine the bread crumbs, eggs, cheese, onion, garlic, pepper, and parsley. Add the cooled sausage to the mixture and stir until combined. Fill each mushroom cap with about a tablespoonful of the sausage mixture, and don't worry if the filling piles up and overflows a bit. When all mushrooms are filled, sprinkle some extra grated cheese on top.

Bake for 15-20 minutes, until filing is set and sizzling. Serve immediately and enjoy!


Saturday, March 28, 2009

My Ultimate Comfort Food


I have gotten a lot of requests over the past several weeks for a rockin' recipe for macaroni and cheese. In face, some of you who know me in *real life* have expressed your shock and concern over the lack of a mac 'n' cheese recipe here on VV. This reaction is understandable, considering that the truth is . . . . macaroni and cheese is my #1 favorite food of all time!

Mac 'n' cheese is the food of my dreams, the food of my childhood, the food of my adulthood. I don't think I ever met a bowl of mac I didn't like. I'm going to come out and admit, flat out, that I am not too proud to make the occasional Kraft Mac 'n' Cheese - heck I practically grew up on the Blue Box. And I have been known to eat Velveeta Shells and Cheese right out of the pot, while sitting on the couch indulging in a sappy chick flick.

I like mine with broccoli, I like it with bacon, I like it baked, I like it from the stove-top. I

Your comments and requests, dear readers, do not fall on deaf ears. Added bonus? No slaving over a hot stove - this recipe is extra easy, with no beschemel sauce to cook.

With that, I am proud to unveil, my S'Mac 'n' Cheese! This is an incredibly flavorful dish, highlighting the sharp cheddar flavor while bringing a subtle heat and a soft onion flavor to the foreground.


S'Mac 'n' Cheese

You will be smackin' your lips . . .

1 1/4 cups elbow noodles
Salt
2.5 ounces extra-sharp cheddar cheese, cut into small cubes
1 tablespoon plus 1/2 teaspoon flour
3/4 teaspoon salt
3/4 teaspoon dry mustard
A pinch or two fresh ground pepper
A pinch cayenne pepper or red pepper flake
A pinch of ground nutmeg
1/3 cup sour cream
1 egg, lightly beaten
3 tablespoons yellow onion, finely chopped or grated
3/4 cup half-n-half
3/4 cup heavy cream
2 shakes Worchestershire sauce
1 dash hot sauce (tobasco)
3/4 cup (about 5 ounces) extra-sharp cheddar cheese, grated

Preheat your oven to 350 degrees. Bring a large pot of water to a boil. Sprinkle in som salt. Add the noodles and cook until al dente, according to the box instructions.

Meanwhile, grease an 8x8-inch baking dish. Drain the noodles well and pour them evenly into the prepared dish. Sprinkle in the cubed cheddar cheese, and mix gently until evenly distributed. Set the dish aside.

Measure the flour, the salt, the dry mustard, black pepper, cayenne pepper, and nutmeg into a large mixing bowl, stirring the ingredients together. Add the sour cream and eggs, whisking until blended. Next, whisk in the onion, half-and-half, heavy cream, Worcestershire, and tobasco until the mixture forms a custard-like sauce. Pour this mixture over the macaroni in the baking dish. Finally, sprinkle the grated cheese evenly over the top.

Bake until the custard sauce sets around the edges but is still a bit saucy in the middle, about 30 minutes. After baking, allow the dish to cool for at least 10 minutes before serving. Enjoy!

Thursday, March 26, 2009

Going Bananas


One of my culinary inspirations growing up was Nathalie Dupree. Her cooking show on TV was one of my favorites, and to this day, I swear by her cookbook New Southern Cooking. But the best thing about her show was that things didn't have to be perfect. She would spill a little flour on the counter, pick egg shells out of the bowl, or maybe get a few cake crumbs stuck in the frosting. But that was alright - it almost made it better, more homemade.

I do enjoy recipes from perfectionist chefs, like Martha Stewart, from time to time. But when it comes right down to it, perfect pastries are not my style. I like things to look, taste, and feel homemade.

Banana Pudding
based on Nathalie Dupree's recipe

1/2 cup sugar
1/8 cup flour
a pinch of salt
1 1/2 cups milk
4 egg yolks
2 teaspoons vanilla
1/2 a pinch of nutmeg
30-40 vanilla wafers
4 bananas, sliced
4 egg whites
2 tablespoons sugar

To make the custard, mix together the 1/2 cup of sugar, the flour, and the salt. Pour the milk into a heavy saucepan and add the dry ingredients. Cook the mixture over medium-low heat. Beat the egg yolks lightly with a whisk. Pour a little bit of the hot milk mixture into the egg yolks, whisking together. Then add the egg mixture to the saucepan. Bring the custard to a boil over low heat, stirring constantly, and cook until thick enough to coat the back of a wooden spoon.


Remove from the heat and stir in the vanilla and nutmeg. Cover with plastic wrap directly on the surface to prevent a skin from forming.

Line the bottom and sides of an 8x8-inch baking dish with vanilla wafers. Next, line it with a layer of banana slices. Repeat, alternating layers of wafers and bananas until you have used them all.


Then pour over the custard so that it completely covers the bananas and the wafers.

Preheat your oven to 375 degrees. Using an electric mixer, beat the egg whites until they form soft peaks. Gradually add the 2 tablespoons of sugar and continue to beat until stiff, glossy peaks form. Spread the meringue fully over the top of the pudding, so that it touches the edges of the baking dish.


Bake until lightly browned, about 15-20 minutes. You may serve the pudding warm or chilled. Serves 6-8.

Carbonara Pizza


And yet another recipe from last week's wine tasting. This tasty little dish was a great appetizer and paired nicely with our Da Vinci Chianti Classico. The topping of this pizza is a re-creating of a carbonara pasta dish - complete with pancetta, eggs, and ricotta!

Pancetta is a wonderful Italian style bacon, with a great smoky-n-salty flavor. And the gorgeous cheesy mixture on top somehow manages to seem rich and light at the same time. This would be a fun weeknight meal or a tasty appetizer to get your guests going before an Italian meal.

Carbonara Pizza
from Rachel Ray

Cornmeal, for sprinkling
1 lb. pizza dough, at room temperature (recommended: Trader Joe's)
1 tablespoon extra virgin olive oil
1/4 lb. pancetta, chopped
1 cup ricotta cheese
1/4 cup grated pecorino romano cheese (parmesan would also work well)
2 egg yolks, beaten
1 clove garlic, grated or minced
Pepper, to taste
1 1/2 cups shredded provolone cheese
1/3 cup chopped flat-leaf parsley

Preheat your oven to 450°. Sprinkle a few pinches of cornmeal on a baking sheet. Place the pizza dough on the sheet and stretch it into a large round or rectangle. If stretching is difficult, use a rolling pin. Brush the dough with the olive oil and partially bake the crust until puffed and slightly golden, about 8 minutes.

Note: If you are pressed for time, you could start right >>here<< in the recipe with a pre-made crust like Mama Mary's or Boboli's. :-)

Warm up a small skillet over medium heat. Add the pancetta and cook, stirring often, until crisp and browned, about 5 minutes. Transfer the pancetta to a bowl lined with paper towels and allow it to drain and cool.

In a medium bowl, combine the ricotta, pecorino romano, egg yolks and garlic; next add the pancetta. Season the mixture with pepper, stirring to combine.

Spread the ricotta-pancetta mixture over the partially baked pizza dough, leaving a 1/2-inch border around the edges for a crust. Top the pizza with the provolone. Bake until the crust and topping are golden and cooked through, about 12 minutes.

Sprinkle with parsley, cut into wedges, and serve immediately!

Wednesday, March 25, 2009

Bell and Boursin Tenderloin


Here is another recipe from our weekend wine-tasting. We served this as the main course, paired with a nice bold Cabernet Sauvignon from Avalon Winery and a fun red blend called Ménage à Trois.

This was probably the favorite dish of the night! The meat was so tender and juicy. The Boursin and roasted red peppers melted in your mouth, just like the tenderloin did! This is a great recipe for an upscale summer cookout with a crowd. One tenderloin easily fed all 10 of us!

Bells and Boursin Beef Tenderloin
Inspired by Molly Jean, the Rookie Chef

2-3 lb. whole beef tenderloin, trimmed (got ours at Trader Joe's - yum)
Salt and pepper, to taste
Olive oil
1 10-ounce jar of roasted red bell peppers (or you can make your own)
1 4-ounce package Boursin cheese (recommended: garlic and fine herbs)


Preheat your grill to medium-high heat. Tie your beef into an even, round roast if necessary so that it will cook evenly. Season the outside of the roast generously with salt and pepper, or a seasoning rub of your choice. You can also spray or brush the meat with olive oil to prevent sticking.

Using metal tongs, apply the meat to the hot grill, browning and caramelizing the surface of the meat, turning until all sides are nicely seared. Turn the grill down to low heat (or move the meat to a lower-heat area of the grill) and continue to cook until a meat thermometer inserted into the center of the tenderloin registers between 120-130 degrees (for medium-rare).

Remove the meat from the grill, cover it lightly with foil, and allow it to rest for 15-20 minutes. The temperature of the meat should continue to rise about 10 degrees as it rests. Meanwhile, pour your roasted red peppers into a microwave-safe dish and heat for about 30-45 seconds, until the peppers are fragrant and steaming.

After the meat has rested, cut your tenderloin into 3/4" slices and arrange on a large platter. Top each slice with a generous slathering of Boursin cheese. Then layer a warm roasted red pepper on top. Serve immediately.


Roasted Reds

Here is an easy recipe for making your own roast red bell peppers in the oven or on a grill. We grow loads of bell peppers in our garden during the summer, and I'm already looking forward to this year's crop.

Smokey, caramelized red bells are great on their own, but you will usually find them included in recipes with other ingredients, like this beef tenderloin dish. You can also puree them to make a sauce or a dip. They have a bold, sweet flavor without being spicy or overpowering. I could eat them like candy.

Roasted Red Bell Peppers

4 red bell peppers
4 tablespoons olive oil
1 tablespoon balsamic vinegar
1/2 teaspoon salt

Cut your bell peppers into quarters lengthwise, and cut out the stem, vein, and seeds. Place them on a large greased baking sheet with the peels facing upward.

For oven:

Preheat your oven to broil, making sure that your oven rack is on the highest shelf it can go to. Cover a heavy-duty baking sheet with foil and apply cooking spray to the foil. You can also use a broiling pan and simply apply cooking spray directly to the pan.

Broil the peppers about 2 inches from the heat for about 10-12 minutes, or until the peppers' skins turn blackened and charred.

For grill:

Preheat your grill to high heat. Grill the peppers skin-side-down for about 5-7 minutes, or until the peppers' skins turn blacken and charred.

For both:

Remove from the oven or grill and place the peppers in a paper bag, closing it tightly and allowing the peppers to cool.

Peel the skin off the peppers and cut the flesh into strips. Combine the olive oil, balsamic vinegar, and salt in a glass jar or a Tupperware container and add the peppers.

You can store your peppers in the fridge for several days.

Monday, March 23, 2009

The envelope, please . . .


First, I'd like to thank everyone who participated in VV's First Giveaway, which celebrated my first 100 posts. I love hearing from my readers on the blog, via email, and in real life, too! This blog has been such a fun way to connect with you all, and I feel very honored to be able to share my favorite recipes with you all.

I am pleased to announce that the results of VV's First Giveaway are in, and the lucky winner selected by Random.org is . . .

#24!!!

Comment #24 comes from Bekkah who said...

I think my favorite family recipe is my grandmother's chocolate chip cookie recipe. She makes them with cinnamon and they always come out perfect.

Congratulations, Bekkah! I think you will really enjoy The Secrets of Jesuit Breadmaking - it's a great resource for bakers of all skill levels. Please send me an email at vintagevictuals (at) gmail (dot) com to claim your prize!

Thanks to everyone who participated in my first blog giveaway. Family recipes bring up such treasured memories with loved ones who are always in our hearts. I really enjoyed reading all your responses, dear readers, and I look forward to another 100 posts with you all!

Sunday, March 22, 2009

Grilled Salad with Sweet Italian Sausage


Here is the salad that we served during our wine-tasting party. It paired beautifully with the La Crema Pinot Noir. Everyone loved the ginger crostini in this salad - and you will not believe how easy it was to make. This would be a perfect salad to serve at a cook-out - the grilled flavors of the sausage and the onion are complimented so beautifully by the balsamic.

Grilled Salad with Ginger Crostini
Adapted from Rachel Ray

4 tablespoons extra virgin olive oil
3 teaspoons ground ginger
6-8 slices crusty white bread
1 pound sweet Italian pork sausages
2 medium sweet onions, peeled and quartered
3 tablespoons balsamic vinegar
8 cups mixed greens
1/4 cup balsamic vinaigrette (recommended: Newman's Own)

Preheat oven to 300 degrees. In a small bowl, mix together the olive oil and the ground ginger. Brush the ginger mixture generously on the bread slices. Place them on a baking sheet, and bake until toasted and crispy, about 15 minutes.

Meanwhile, using a grill, grill pan, or George Foreman, cook the sausages over medium-high heat, turnning as necessary, until browned and crispy on all side, about 15-20 minutes.

Pour the balsamic vinegar over the onion wedges. Grill on both sides over medium-high heat for about 4 minutes on each side. The wedges should become soft and slightly charred.

In a large bowl, toss the greens with the balsamic vinaigrette until the greens are lightly coated. Divide the salad into 6-8 portions, topping each with a grilled onion wedge and a ginger crostini. Slice the sausages diagonally and divide the pieces among the salads. Serve immediately, and enjoy!

Thursday, March 19, 2009

Chocolate Mint Paddies


These are the perfect chocolate cookies, made only better by the molten chocolate mint candies that nest in the center of them. I am so glad that a friend recommended this recipe to me. You can tell just by reading it that it is a true retro recipe!

These chocolate cookies are chewy, with just a slight crunch around the edge. The texture is perfectly satisfying - chewy and gooey - and the mint centers melt in your mouth to make the perfectly decadent dessert after a weeknight meal. Their colorful swirls were a match made in heaven for our St. Patrick's Day feast this week.


Chocolate Mint Paddies

Adapted from AllRecipes.com

3/4 cup butter
1/2 cup brown sugar
1 cup sugar
2 tablespoons molasses
2 tablespoons water
2 cups semisweet chocolate chips
1 teaspoon vanilla
2 eggs
2 1/2 cups flour
1 1/4 teaspoons baking soda
1/2 teaspoon salt
36 chocolate covered mint candies (i.e. Andes Mints)

In a heavy saucepan, heat the butter, the sugars, the molasses, and the water until melted and completely combined. Remove from the heat, and pour in the chocolate chips, stirring until melted and incorporated. Set the mixture aside to cool for about 15 minutes.

Next, beat in the eggs, one at a time with the vanilla. In a seperate bowl, whisk together the dry ingredients. Gradually add the dry ingredients to the chocolate mixture, stirring until completely incorporated. Cover and chill the dough for at least one hour.

Preheat your oven to 350 degrees and grease 2 large cookie sheets. Roll the chilled dough into walnut-sized balls, and place them about 2 inches apart on the prepared cookie sheets.

Bake the cookies for about 8-10 minutes. Remove from the oven and press a chocolate-covered mint candy into the center of each cookie. Allow the candies to melt for about 1 minute. Then, using a toothpick, swirl the mint portion of the candy in a decorative fashion. Remove the cookies to racks to cool completely. Yield 3-4 dozen cookies. Enjoy!

Wednesday, March 18, 2009

100% Pure Love


This is the 100th Vintage Victuals post!!!

In celebration of this momentous occasion, dear readers, I am happy to share with you a fantastic recipe for 
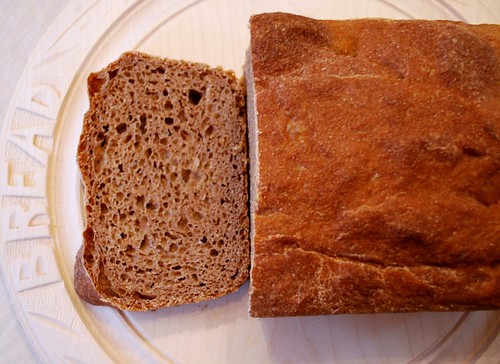
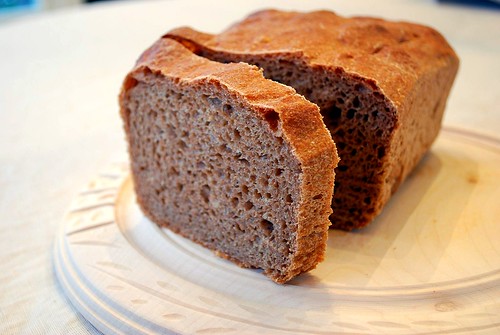
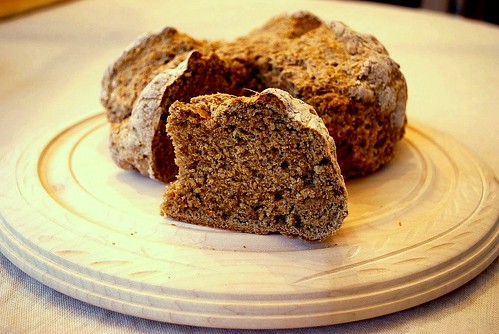
100% Whole Wheat Bread. I'm also pleased to announce my very first VV Giveaway!!

The recipe in this post comes from one of my all-time favorite cookbooks - packed with vintage recipes, of course! It's the Secrets of Jesuit Breadmaking, and you can win this cookbook from Vintage Victuals! The Jesuits have a special place in my heart, as I am, in fact, the product of a Jesuit college education. You may recognize this book from earlier posts on Vintage Victuals.

This is a great resource full of tried-and-true bread recipes that one Jesuit priest gathered from Jesuits around the world through the course of his career as a Jesuit cook. It is also chock full of great breadmaking tips and cute stories about the origins and stories that each recipe brings to the writer's mind. It reminds me a lot of what I love best about cooking and baking - the stories and families that come together around food.
To win this cookbook, all you have to do is leave a comment on this blog post answering the following question: What is your favorite family recipe or traditional dish?

Your comment must be posted by Sunday, March 22, 2009 at 11:59 PM EDT. One winner will be randomly chosen by Random.org's Interger Generator based on the number of your comment and will be announced on Monday, March 23, 2009. Good luck!

EDIT: I've gotten reports from 2 or 3 of you that you've had problems leaving a comment. I think I've fixed the glitch, but if you still have problems, then please email me and I will assign you a number for the giveaway!!


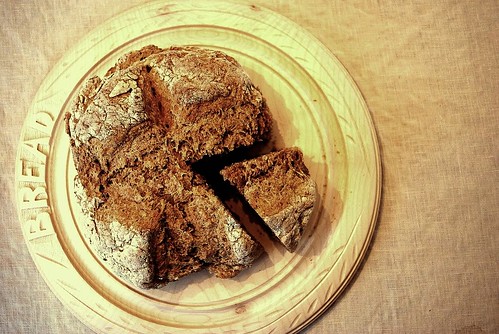
Now back to the recipe! This is the whole wheat bread of my DREAMS. Soft, moist, dense, and hearty. Nutty and malty but mild and ever-so-slightly sweet. It toasts up perfectly with a pad of butter and a drizzle of honey. It also makes for an unbelievable turkey sandwich. Chalk up another one for the Jesuits!

100% Whole Wheat Bread

from the The Secrets of Jesuit Breadmaking

1 tablespoon active dry yeast
2 1/2 cups warm water
3 tablespoons vegetable oil
2 tablespoons honey
1 tablespoon molasses
2 teaspoons salt
5-6 cups 100% whole wheat flour (recommended: King Arthur)


First, make the "sponge." In a large mixing bowl, combine the yeast and the warm water and stir until the yeast dissolves. Next, stir in the oil, the honey, the molasses, and the salt. Gradually stir in about 2 1/2 cups of the flour. The dough will be wet and soupy, but a bit spongy. Cover with plastic wrap, and let the sponge ferment for 1 hour.

Next, stir down the sponge, breaking all the bubbles up with a wooden spoon. Using an electric mixer, beat the sponge for 10 minutes, gradually adding about 2 more cups of the flour. The dough should become very thick and tacky, and it should begin to pull away from the sides of the bowl.

Turn the dough out onto a lightly floured board. The dough will be heavier than regular white-floured doughs. Knead for at least 8-10 minutes, adding flour as needed to prevent stickiness. It should feel smooth and elastic.

Spray a large bowl with cooking spray. Place the kneaded dough into the bowl, turning it to coat the dough on all sides with the oil. Cover with plastic wrap and allow it to rise for at least 1 1/2 hours in a warm, draft-free place. The dough will double in size.

Meanwhile, grease two 9x5-inch loaf pans. When dough has risen, punch it down gently. Divide the dough in half and shape each into loaves. Place them into the prepared pans. Cover with a tea towel and allow to rise again for about 45 minutes, until doubled in bulk.

Preheat your oven to 350 degrees. Bake the loaves for 40 minutes. Transfer to wire racks to cool. When loaves have cooled completely, then you can slice them up and enjoy!

Tuesday, March 17, 2009

Beannachtaí lá Fhéile Pádraig Duit, A Sheáin Léitheoirí!

Blessings of St. Patrick's Day to You, Dear Readers!

As I've mentioned a few times now, I have a mostly Irish heritage. So today is a fun and festive day in my family when we celebrate with food and friends! Here is what I put in my crock pot this morning. As opposed to a London Broil, I like to call this a Dublin Boil.

Here is what my crock pot probably looks like right now, bubbling away in my kitchen:


I can't wait to get home and enjoy this overflowing, bountiful Irish feast!

Dublin Boil

Inspired by a few recipes I perused in The Frugal Gourmet on Our Immigrant Ancestors:Recipes You Should Have Gotten from Your Grandmother

3 lbs. corned beef brisket
2 12-ounce bottles Irish lager beer
2 cups of water
1 bay leaf
8 black peppercorns
1/3 cup chopped flat-leaf parsley
1 teaspoon Worcestershire sauce
2 teaspoons salt
1/2 teaspoon fresh ground black pepper
2 large carrots, peeled and cut into 1" rustic chunks
1 lb. small red potatoes, rinsed clean and sliced in half
2 tablespoons Irish butter
2 large cloves of garlic, peeled and sliced
1 medium yellow onion, peeled and sliced
1 cup leeks, rinsed and chopped, white part only
1 large rutabaga (i.e. turnip), peeled and chopped into 1" chunks
1 large green cabbage, cut into quarters or sixths
Salt and fresh ground black pepper to taste


Spray the inside of your 8-10 quart crock pot with cooking spray. Place the corned beef brisket in the crock pot. Add the beer and enough of the water to cover the beef. Next, add the bay leaves, the peppercorns, the parsley, the Worcestershire, and the salt and pepper. Also add the potatoes and the carrots to the pot.

In a heavy skillet, heat the butter over medium heat until melted. Add the garlic, the leeks, and the yellow onion, sautéing for 4-5 minutes. Add these veggies to the crock pot.

Cover the pot and cook on low for 8-10 hours, or until the meat is very tender. In the last hour or two of cooking, add the turnips and the cabbage. Taste the broth and season as needed with the salt and pepper.

Remove the bay leaf before serving. Serve hot in generous bowls with a wedge of Irish Soda Bread.

Monday, March 16, 2009

Chicky-Chicky-Parm, Chicky-Chicky-Parm


Have I ever mentioned that my brothers are a little bit silly? Yeah, they used to sing "Chicky-Chicky-Parm, Chicky-Chicky-Parm" whenever my mom would make us Chicken Parmesan. And they always did it with this incredibly catchy but annoying rhythm to it. So now I'm cursed because what I think of every time I have Chicken Parmesan!!

Here is an easy and "lighter" (i.e. not fried) version of this dish that you can make in the crock pot. It even came out pretty crispy on the top. Don't ya just love it when things are easy AND delicious?!

Crock-Pot Chicky-Parm

4 raw skinless boneless chicken breasts;
1 cup flour
1 egg, lightly beaten
1 cup panko bread crumbs
1/4 cup freshly grated parmigiano reggiano cheese (plus extra for sprinkling)
1 teaspoon salt
1/2 teaspoon pepper
1 teaspoon Italian seasoning
1 jar of your favorite marinara sauce
1 cup shredded mozzarella cheese
Fresh parsley or basil for garnish

NOTE: Chicken can be fresh OR frozen. For frozen (which I used here), simply add an extra hour of cooking time.


Apply cooking spray to the inside of your crock pot. Next, set up three shallow bowls. In the first bowl, place the flour and half of the salt and pepper. In the second bowl, place the lightly beaten egg. In the third bowl, place the panko bread crumbs, the parmigiano reggiano, the rest of the salt and pepper, and the Italian seasoning. Take your chicken breasts one at a time, and dip them first in the flour, coating completely. Next coat with the egg mixture. Finally, coat with the panko mixture. Then place the chicken breast in the bottom of your crock pot. Repeat with the other chicken breasts.

Pour your marinara sauce around the sides of the chicken breasts. (Around, not on top - this will keep the tops crispy.) Sprinkle a few more tablespoons of the parmigiano reggiano cheese on top of the breasts. Cover and cook on low for 7-9 hours. During the last hour of cooking, top the chicken with the shredded mozzarella cheese so that it can melt and get nice and bubbly. Garnish each serving with fresh parsley or basil. Serve with spaghetti or angel-hair pasta.

Saturday, March 14, 2009

May the Rain Fall Soft Upon Your Fields


Happy St. Patrick's Day, dear readers! As I may have mentioned before, I come from a very strong Irish bloodline, and March 17th is a day to celebrate. Tonight we celebrated our Irish heritage a few days early with wonderful friends and delicious food. I was in charge of the soda bread. I found a great recipe in a book I found recently at a book fair. It was a major crowd pleaser and an excellent accompaniment to our corned beef and cabbage!

Hearty, dense, and full of wheaty flavor, this bread is as close as you will come to the staple on Irish tables across the green countryside each and every day. It is a quick-bread, made without yeast. It has a delicate crumb with a wonderfully grainy texture. The whole wheat flour gives it a soft nutty flavor. I can't wait to toast a piece for breakfast tomorrow morning - with a tab of butter and a drizzle of honey, perhaps?


Irish Brown Soda Bread
from the Frugal Gourmet on Our Immigrant Ancestors: Recipes You Should Have Gotten from Your Grandmother, by Jeff Smith

2 cups of flour
3 cups whole-wheat flour
2 teaspoons baking soda
1 tablespoon baking powder
2 tablespoons brown sugar
2 1/4 cups buttermilk

Preheat oven to 400 degrees.

Measure all dry ingredients into a large mixing bowl, combining well and making sure that there are no lumps of brown sugar. Pour in the buttermilk and stir with a wooden spoon just until a soft dough forms.

Turn the dough out onto a lightly floured surface and knead for about a minute until the dough comes together. Divide the dough in half, and press down on the top of each half to flatten. Place the two loaves on a large ungreased baking sheet - preferably non-stick. Sprinkle the tops of the loaves with a little bit of flour, and, using a sharp knife, mark the shape of a cross on the top of each loaf.

Allow the two loaves to rest for at least 10 minutes before baking. Bake on the middle-rack of the oven for about 40-45 minutes, or until the crust is toasty, brown, and crunchy.

Cool on racks and serve with Irish butter.

Thursday, March 12, 2009

Doing small things in a great way . . .


Here is a fun mini-muffin recipe that I made with some more ripe bananas I wanted to use up. It is based on my Banana Cake recipe, but I've added nuts and spices to make a tender, hearty, cozy morning treat.

Banana-Nut Spice Mini-Muffins

2 1/4 cups flour
1 2/3 cups sugar
1 1/4 teaspoons baking soda
1 teaspoon salt
2/3 cup shortening
2/3 cup buttermilk
3 eggs
1 1/2 cups mashed ripe bananas
2 tablespoons orange juice
2 teaspoons cinnamon
1/2 teaspoon nutmeg
1/2 cup walnuts, chopped
1/2 cup pecans, chopped
Powdered sugar


Preheat your oven to 350 degrees. Grease your mini-muffin tin with cooking spray or line each cup with a parchment liner.

Measure all ingredients into a large electric mixer bowl. Blend for 30 seconds on low speed, scraping down the sides of the bowl. Next, beat for three minutes on high speed. Fill mini-muffin tins about 2/3 of the way full.

Bake 15-20 minutes, or until slightly golden brown around the edges. Cool completely on racks.


When muffins are completely cool, sprinkle with powdered sugar, and serve!

Note: If you would like to adapt this recipe for regular-sized muffins, simply increase the baking time to 20-25 minutes!

Tuesday, March 10, 2009

Banana Cupcakes with Classic Cream Cheese Frosting


I'm going to be completely honest with you, dear readers. I love to bake. But I also love to bake quickly. Nanny can tell you plenty of stories about how fast I can throw a pie together. So it makes perfect sense that some of my favorite recipes are what I like to call "dump and mix" recipes. Basically, the directions on these recipes read something like this:

"Preheat your oven and grease the pan. Dump all the ingredients into a bowl and mix well. Bake for 30 minutes and enjoy."

With recipes as simple and quick as this, I just don't see how you can justify using store-bought cake mixes. Okay, I admit that I'll use a mix when I'm in a pinch - but I usually goose it up à la Cake Mix Doctor. But I very much prefer baking from scratch, and I honestly believe it doesn't have to be any harder than baking a cake from a mix!

Confession: I wrote an "argumentative essay" in my 8th grade English class. What topic did I choose? Reasons why people should bake from scratch and not use store-bought mixes. When I presented my topic to my teacher, she was very skeptical. But I ended up with an A+ on that masterpiece.

This is one of those recipes that goes right to the heart of my position on this issue. This dump-n-mix recipe for banana cake is incredibly simple, super-quick, and outrageously moist and flavorful. I like to top it off with a classic cream cheese frosting. I usually make this as a layer-cake, but this time I decided to go for some cute cupcakes.

On an unrelated side-note, check out the photo below, in which my dog Sophie is making another special Vintage Victuals appearance. Even from outside the window, she knows there are good things going on in the kitchen - especially when I get the camera out!


Banana Cupcakes

Adapted from my vintage Betty Crocker cookbook

2 1/4 cups cake flour
1 2/3 cups sugar
1 1/4 teaspoons baking soda
1 teaspoon salt
2/3 cup shortening
2/3 cup buttermilk
3 eggs
1 1/2 cups mashed ripe bananas

Preheat your oven to 350 degrees. Grease your desired baking pan: either a 13x9x2 inch pan, two 9-inch round layer pans, three 8-inch round layer pans. Or line cupcake tins with liners.

Measure all ingredients into a large electric mixer bowl. Blend for 30 seconds on low speed, scraping down the sides of the bowl. Next, beat for three minutes on high speed. Pour the batter evenly into the prepared pans, or fill cupcake tins about 2/3 of the way full.

Bake oblong 45-50 minutes, layers 35-40 minutes, cupcakes 20-25 minutes. Cool completely on racks.


Classic Cream Cheese Frosting
1 8-ounce package of regular cream cheese
1/2 cup (1 stick) butter, softened
2 cups powdered sugar
1 teaspoon vanilla

Blend together cream cheese and butter. With mixer on low speed, gradually add the powdered sugar until completely incorporated. Add the vanilla, and blend. You may add extra sugar or add a little bit of milk to thicken or thin the frosting to the desired consistency.

Monday, March 9, 2009

Colorful Mexicorn


Over the past few months I've gotten some questions from readers about what "Mexicorn" is. It appears as an ingredient in several of my recipes. It's produced by Green Giant - simply a mixture of corn, bell peppers, onion, and seasoning.

Mexicorn is actually a very handy ingredient that you can find in your local grocery store on the canned vegetable aisle. It looks like this:


But I also love to make Mexicorn as a fresh side dish to go with enchiladas and tacos. The light and crunchy combination of veggies is a refreshing accompaniment to any zesty meal.

Homemade Mexicorn

2 tablespoons olive oil
2 cups of fresh or frozen corn kernels
1/4 cup red bell pepper, diced
1/4 cup green bell pepper, diced
1/4 cup red onion, diced
1/2 teaspoon salt
1/2 teaspoon pepper
a pinch of cumin
1 teaspoon lime juice
3 tablespoons fresh cilantro, chopped

Heat the olive oil in a large skillet over medium heat. Add corn, bell peppers, red onion, salt, pepper, cumin, and lime juice. Cook, stirring occasionally, over medium heat until vegetables are slightly tender, about 5 minutes. Remove from heat and toss with fresh cilantro.

Friday, March 6, 2009

Apple-Cheddar Turkey Burgers


Here is another of our favorite turkey burgers that hubby and i love to grill up on a mild spring evening. The idea for the grilled granny smiths was inspired by a Bobby Flay recipe that I came across - but we changed the cheese and added some extra flavor to the burger patties. The ingredients may sound like an odd combination but trust me, dear readers - they come together beautifully!


Apple-Cheddar Turkey Burgers

1 lb. ground turkey breast meat
1 teaspoon extra virgin olive oil
1 teaspoon Worcestershire sauce
1 small egg, lightly beaten
1/3 cup onion, minced and lightly browned in a pan with a bit of olive oil
1/2 teaspoon salt
1/2 teaspoon pepper
1/2 teaspoon garlic powder
A pinch of dried thyme or sage or poultry seasoning
1 large Granny Smith apple, cored and sliced cross-wise
4 large slices extra sharp cheddar cheeses
4 buns, toasted
Grilled sliced onions for topping, if desired

In a medium bowl, use a fork to lightly combine the turkey meat, the olive oil, the Worcestershire, the egg, the browned onion, the salt and pepper, the garlic powder, and the poultry seasoning. Divide the meat into 4 equal parts and gently form into patties.

Heat your grill to medium heat. Lightly spray the patties with cooking spray, and put them on the grill. Cook on both sides until the meat is done all the way through - it will take about 4-6 minutes per side.

Meanwhile, spray the apple slices with cooking spray - grill on both sides until slightly caramelized - about 2-3 minutes per side.

Broil the buns with the cheddar cheese for about 2-3 minutes, if desired.

Assemble your burgers, placing the grilled apples on top of the cheese. Top your burger with more onions, if desired. Serve with your favorite sides - enjoy!


Made by Lena