Friday, July 31, 2009

Strawberry Bread


This recipe hadn't been made by anyone in my family in about twenty years - until last week. I made a loaf for hubby and me so that we could have a summery breakfast bread to take on the go in the mornings - and just one bite of this incredibly unique bread took me back to when I was a little girl. So moist and flavorful with a hint of spice, and the bursts of juicy-sweet berries . . .

I had to make it again, this time two loaves! A nice thick slice in the morning with my cup of coffee - the perfect way to start a summer day!


Strawberry Bread

from my mom's friend Alice

2 1/2 cups strawberries, chopped (frozen strawberries work too!)
2 tablespoons sugar
3 cups all-purpose flour
2 cups sugar
1 teaspoon baking soda
1 teaspoon salt
1 teaspoon ground cinnamon
4 eggs, beaten
1 ¼ cup vegetable oil
1 teaspoon vanilla

In a medium bowl, mix the strawberries with the 2 tablespoons of sugar. Cover and refrigerate for at least 30 minutes, until the juices start flowing!

Preheat your oven to 350 degrees. Grease well two 8x5-inch loaf pans. Combine first 5 ingredients in large mixing bowl; make a well in the center. In a separate bowl, combine remaining ingredients (except strawberries), stirring just until combined.

Gently fold in the strawberries with their juices. Divide evenly between the prepared loaf pans, and bake for 55-60 minutes, or until a toothpick inserted into the center of the loaves come out clean. Cool for 10 minutes and then remove to racks.

Note: this recipe also makes great muffins. Fill muffin cups almost full and bake for 20-25 minutes.


Thursday, July 30, 2009

What's a girl to do?


O, mon dieu, chers lecteurs. This is a fab find!

I'm at home alone (with the dogs) tonight - hubby's away at a leadership conference. I decided to make dinner easy - boiled gnocchi with Newman's Own tomato sauce . . . garlic toast on the side.

What do you crave after eating Italian? My mom and I always have a taste for chocolate! But here I am, all alone. It would be wasteful (right?) to make brownies, to go out and get a pint of ice cream, to open a new box of Oreos . . . What's a girl to do in this kind of emergency???

Enter . . . Emergency Chocolate Cake.

Moist, fluffy, chocolaty heaven. A mug full of cupcake. Satisfaction, in two minutes flat.

I think I may have another . . . this time with a pinch of cinnamon perhaps?

Emergency Chocolate Cake

I got this from the Rookie Chef, who got it from One Particular Kitchen

2 tablespoons cake flour
2 tablespoons sugar
1/4 teaspoon baking powder
2 (slightly heaping) teaspoons cocoa powder
a pinch of salt
2 tablespoons of milk
1/2 teaspoon vanilla
2 teaspoons oil

Spray the inside of a microwave-safe coffee mug with nonstick spray. Measure the ingredients into the mug and stir with a fork until smooth and no lumps remain. Microwave on high for 60 seconds.

That's it!!!

You can eat it with a fork straight out of the mug (as I did) , or turn it out onto a plate and top it with chocolate syrup or whipped cream. Perfection!


Wednesday, July 29, 2009

Old Fashioned Homemade Lemonade


Another one of my first cookbooks when I was growing up was the the Anne of Green Gables Cookbook. I'm not afraid to admit it - I love those books AND the movies! I have to watch every time Anne comes on public television. This Old Fashioned Homemade Lemonade was a summer favorite year after year.

Old Fashioned Lemonade
from the Anne of Green Gables Cookbook

1 1/2 cups sugar
1 1/2 cups water
grated peel over one lemon
1 1/2 cups lemon juice
Ice cubes
Cold water
Fresh mint leaves

Measure the sugar, the water, and the lemon zest into a large saucepan. Bring the mixture to a boil for five minutes, stirring constantly. Let the mixture cool to room temperature.

Add the lemon juice to the cooled mixture. Pour this syrup into a jar and cover tightly with a lid. This syrup can be kept in the refrigerator for 2 to 3 weeks.


When you're ready to enjoy some lemonade, put ice in each serving glass and pour 1/4 cup of the lemon syrup over the ice. Add 3/4 cup of cold water over the top, and stir. Add some fresh mint leaves to each glass. Yield approximately 12-14 glasses. Enjoy!


Saturday, July 25, 2009

My Mint Mojitos


When I was a little girl, I used to love to mix up "potions" - usually the remnants of nearly empty shampoo and lotion bottles, mixed with a few squirts of hand soap and perhaps some bubble bath. I'd put my potion in a bottle and mix it up, and then attempt to sell it to my Mom, her friends, whoever was around. Yep, I was the little entrepreneur.

Well, Mom should have known back then that her little potion-mixer (apothecary, perhaps?) would be a bartender one day. During my brief career as a mixologist, my absolute favorite drinks to make were the ones that had many ingredients: Bloody Marys, Long Island Ice Teas, etc. Even better than that? A drink that requires a muddler. I love to muddle. What can I say? Dirty martinis, mint juleps, mojitos . . . Muddling just plain rocks.

So here is a great muddled-up cocktail to refresh you on a hot summer afternoon: My Mint Mojitos. See if you can muddle your way through this one! (I couldn't resist . . .)

My Mint Mojitos

The leaves from one good sprig of mint (8-10 large leaves)
1 tablespoon sugar
Ice
2-3 tablespoons fresh lime juice
1 shot (1 oz.) of light rum
about 1/3 cup of club soda
1 sprig of mint for garnish

Prepare your serving glass with ice, and set aside.

In a shaker (or a glass, if you don't have a shaker), place the mint leaves and the sugar. Using a muddler (or any blunt-ended kitchen tool), mash up the mint leaves into the sugar until they release their oils and become very fragrant.

Next, add some ice, the lime juice, and the rum. Shake (if you're using a shaker) or stir (if you're using a glass). Pour the mixture over the ice in your prepared serving glass, straining the leaves out if desired. (Personally, I don't desire.) Top with club soda and garnish with a mint sprig. Enjoy!


Friday, July 24, 2009

Slow Cooked Fresh Tomato Sauce


Tomato season is in full swing here in North Georgia, and those 'maters were piling up high in our kitchen this week! I decided to take all our fresh, ripe Roma tomatoes and make a gorgeous slow-cooked tomato sauce.

I'm not gonna lie to you, dear readers. This sauce was a heck of a lot of work! In the end, was it really truly worth it?! Oh, heck yeah!!!

Fresh Tomato Sauce
made up on the fly by yours truly

2 lbs. fresh, ripe tomatoes (or 2 large cans crushed tomatoes)
2 tablespoons olive oil
1 medium green pepper, diced
1 medium onion, diced
3 large cloves of garlic, minced
1 cup water
1 tablespoon of your favorite Italian seasoning blend
1 tablespoon balsamic vinegar
3 tablespoons sugar
1/2 cup Italian red wine (optional)
3 tablespoons tomato paste
Fresh basil and oregano

Boil a large pot of water. Place the tomatoes (in batches if necessary) into the boiling water for 60 seconds. Remove the tomatoes with a slotted spoon and place into a bath of ice water to cool. When tomatoes are cool enough to handle, remove the skins, and core/seed the tomatoes. (BTW, this part will really freaking hurt if you have paper cuts on your fingers - oow!) Place the remaining flesh into your crock pot.

In a large skillet, heat the olive oil over medium-high heat. Add the green pepper and onion, sauteeing until soft - about 5 minutes. Add the garlic and cook for another two minutes. Pour the veggies over the tomatoes in the crock pot.

Next, add the water, Italian seasoning, vinegar, sugar, and wine into the crock pot. Turn on low and cook for 4-7 hours, stirring occasionally if possible (i.e. get your husband/friend/dog to do it when s/he comes home for lunch). During the last hour of cooking, add the tomato paste and a teaspoon or two of fresh basil and oregano, chopped.

If you like a finer texture, then transfer half of the sauce to a blender or food processor and carefully blend until smooth (remember you're dealing with a very hot liquid!). Return the blended sauce to the crock pot and stir.

Serve hot over cooked pasta of your choice, and garnish with fresh herbs. Enjoy!


Wednesday, July 22, 2009

Lime and Cilantro Grilled Shrimp


Here's a quick weeknight meal for the summertime! the flavors meld beautifully, and the grill keeps all the heat outside, where it belongs!

Lime and Cilantro Grilled Shrimp

4 limes, juiced
1 teaspoon lime zest
3 tablespoons olive oil
1 teaspoon garlic powder
1/4 cup finely chopped cilantro, plus extra for garnish
Salt and pepper to taste
1 lb. shrimp, peeled and de-veined

In a small saucepan, combine the lime juice, zest, olive oil, garlic powder, cilantro, salt, and pepper. Bring to a boil, then reduce the heat and simmer for 5 minutes. Cool completely.

Marinate the shrimp in the lime mixture for at least 30 minutes. Then grill over medium-high heat for 2 minutes on each side, or until they are cooked through.

Serve immediately, garnished with fresh cilantro. . . Okay, so I forgot the garnish for the pictures - whatever! They're still pretty!

Tuesday, July 21, 2009

Green Chilaquiles


So, you know me, dear readers. I can't just stop at making salsa out of my tomatillos. I had to incorporate them into a fabulous new dish! I kept reading about green chilaquiles - basically glorified nachos with chicken and tomatillo salsa. I decided to go for it, even though my husband is not a huge fan of chips or nachos.

He ate three bowl-fuls of this stuff!

This dish was delicious! The toasty cheese compliments the tangy salsa perfectly, all atop deliciously moist chicken and crunchy tortilla chips. This one is a keeper!!!

Green Chilaquiles

3-4 big handfuls tortilla chips
1 cup salsa de tomatillo (see recipe above)
2 cups shredded cooked chicken
1 cups shredded monterrey jack cheese
Cilantro, for garnish

Preheat your oven to broil, and grease a 9x9-inch baking dish. Lay a generous bed of tortilla chips across the bottom of the prepared dish. Spread an even layer of chicken over the top of the chips. Drizzle the salsa de tomatillo evenly across the chicken and sprinkle with the cheese.

Broil for 2-3 minutes, until the cheese is melted and bubbly. Garnish with cilantro and serve immediately.


Salsa de Tomatillo


These happy little tomatillos appeared in our CSA basket this week. I had no idea what to do with them, so I started searching around the internet and immediately came up with a bunch of great recipes for tomatillo salsa.

What a perfect way to get to know these little guys! Their slightly sweet and tangy flavor is perfectly displayed in this fresh and zesty salsa. Perfect as a snack with chips, or get more creative and use it as a sauce for grilled chicken or fish. Or make a meal of it with Green Chicken Chilaquiles!

Salsa de Tomatillo
from AllRecipes.com

10 tomatillos, husked and rinsed with cool water
1 small onion, chopped
3 large cloves garlic, minced
1 teaspoon jalapeno pepper, chopped (seeds removed if you're wimpy like me)
1/3 cup chopped fresh cilantro
Salt and pepper to taste

Place tomatillos in a saucepan with enough water to cover. Bring to a boil. Simmer until tomatillos soften and begin to burst, about 10 minutes.


Drain tomatillos and allow to cool. Place in a food processor or blender with onion, garlic, jalapeno peppers, cilantro, salt and pepper. Blend to desired consistency.

Friday, July 17, 2009

Saucy Pork Chops


Here's another retro recipe: this one comes from my mom's collection of little scraps of paper with recipes scrawled on them. I'd call it a recipe box full of recipe cards, except that it's more of a pile of old receipts and other random scraps of paper bearing recipes in her almost indecipherable script stuffed into an old cookbook. My mom and I spent hours one night last week poring over these tid-bits of goodness. This recipe is just one in a treasure-chest of goodies!

Saucy Pork Chops
from our family friend, Bobby

2 tablespoons extra virgin olive oil
6 chops, about ¾ inch thick
Salt and pepper, to taste
1 medium onion, thinly sliced
1 10.5-ounce can condensed cream of chicken soup
¼ cup ketchup
2-3 teaspoons Worcestershire sauce

In a large skillet, heat the oil over medium-high heat. Season your chops with salt and pepper on both sides. Add them to the skillet, browning for 2-3 minutes on each side. Top with onions.

In a medium bowl, combine the rest of the ingredients and pour over the chops. Cover and simmer for 45-60 minutes. Serve hot.

Thursday, July 16, 2009

Chicken and Rice Salad


During the summer here in Georgia, there are days that are so swelteringly hot that you are loathe to turn on any heat-generating appliance in the house. Today was one of those days.

So what do you do for dinner on a day like this? Make a nice, hearty, cold salad like this one!!

Chicken and Rice Salad
my mom's friend Sue

2 6-ounce boxes long grain wild rice (recommended: Uncle Ben's)
3 ½ cups cooked chicken, torn into bite-sized bits
4.5 ounces ripe black olives drained and chopped
½ cup chopped green onion w/ tops
½ cup pecans chopped
1 cup celery, chopped
salt and pepper
1 ½ cup mayo (add gradually)
2 tablespoons chopped fresh parsley

Cook rice according to the directions, but omitting any seasoning packet that might come with the box. Toss all ingredients together except for the mayo and parsley, seasoning with salt and pepper to taste. Stir in the mayo gradually, using only as much as needed to suit your tastes. Chill until ready to serve. Garnish with parsley. Serve with iceburg lettuce cups to make tasty wraps!


Tuesday, July 14, 2009

A Chilled Bean Salad for a Hot Summer Picnic!


Hello, dear readers! Sorry for the brief hiatus - the hubs and I were enjoying a long weekend at the lake with our friends. Good times and good eats were had by all. But now it's back to bloggin'!

One of my favorite things about our CSA farm is the crazy varieties of heirloom and specialty veggies that we get from them - these Chinese Red Noodle Beans come in every summer - they are over a foot long and naturally coil up like snakes. It's fun to cook with these because you can show your guests you're feeding what they look like before (ew!) and what they look like afterwards (yum!).


The recipe for this chilled bean salad comes from our CSA farm's cookbook that they make just for their shareholders. I've changed it a bit over the years, and it is a crowd pleaser every time. Now, don't worry about going out and trying to hunt down Chinese Red Noodle Beans! This salad is fabulous with regular old green beans, too! The dressing is slightly sweet and tangy, and the feta cheese gives this salad that creamy, zesty punch.

Purple Bean Salad
inspired by a recipe from our CSA farm's cookbook

2 pounds fresh purple beans, or a mix of yellow, green, and purple beans
4 tablespoons balsamic vinegar
1 tablespoon Dijonnaise
2 teaspoons lemon juice
1 teaspoon sugar
1/2 teaspoon kosher salt
1/2 teaspoon freshly ground pepper
1/3 cup olive oil
2 tablespoons finely chopped red onion
1/2 cup crumbled feta cheese
Fresh thyme (optional)

Trim stem ends of beans and cut the beans into 1 1/2-inch pieces. Steam in the microwave or in a stove-top steamer until crisp-tender. Drain and rinse with cool water before transferring to a bowl. Cool to room temperature.

In a small bowl, combine vinegar, dijonnaise, lemon juice, sugar, salt, and pepper. Stir until the sugar and salt dissolve. Then slowly stream in the olive oil while whisking the mixture. Pour over the beans, and toss to coat. Refrigerate for at least 1 hour before serving. Sprinkle with feta cheese and garnish with fresh thyme.


Thursday, July 9, 2009

Cookies Transcend Politics


A good meal is good no matter which side of the aisle you eat it on. Yet another example of how food brings us all together!

I made these wonderful cookies for a political-themed election night dinner this past fall. (Don't worry! There were dishes that were blue-state-oriented, too!) Since then, this has become a go-to recipe for me when I'm craving a super-chewy and delicious oatmeal butterscotch cookie! I've made a few small tweaks to the original, but Cindy McCain definitely knew what she was doing when she whipped these cookies up!

Chewy Oatmeal Butterscotch Cookies
adapted from Cindy McCain via Family Circle Magazine

3/4 cup unsalted butter
3/4 cup sugar
3/4 cup light brown sugar, packed
2 large eggs
1 1/2 teaspoons vanilla extract
1 1/4 cups flour
1 teaspoon baking soda
3/4 teaspoon cinnamon
1/2 teaspoon salt
3 cups rolled oats (not quick-cooking - just regular)
1 12-ounce package of butterscotch morsels

Preheat your oven to 375 degrees. Beat the butter and sugars together until light and fluffy. Next, add the eggs, one at a time, beating after each addition so that they are completely incorporated. Beat in the vanilla.

In a separate bowl, combine the flour, baking soda, cinnamon, salt, and rolled oats. Gradually add the dry ingredient mixture into the creamed mixture. Then fold in the butterscotch morsels into the cookie dough.

Drop by heaping tablespoonfuls onto a greased cookie sheet, leaving about 2 inches of space between the cookies because they will spread. Bake for about 8 minutes, or until the edges are lightly golden brown. Allow the cookies to cool on the sheet for 5 minutes before removing to cooling racks. Enjoy!

Wednesday, July 8, 2009

My Cousin, the Meat Lady


So my cousin is pretty much amazing. She is absolutely adorable. Gorgeous, funny, and very smart.

The unexpected part, though, is that my cousin is really into meat. In fact, she is a graduate student in the Meat Sciences program at the University of Georgia. It is absolutely hilarious to see this beautiful, sweet girl talk about slaughtering animals, different cuts of meat, and her research projects.

But the best part is that we get to sample some of the fruits of her labor. The school sells their cuts of meat every Friday afternoon - and she brings us some of her projects that are not for sale, as well!

This is an example of the latter. This is a Greek sausage that the graduate students made. We grilled some last week, and they were amazing! For more great meat info and tips, check out my cousin's blog: The Meat Lady.

Greek Turi Loukaniko
from my cousin, The Meat Lady

10 lb ground lamb shoulder
1/2 lb. feta cheese
10 teaspoons salt
2 tablespoons dried garlic
2 tablespoons dried oregano
4 teaspoons black pepper
2 tablespoons orange zest
3 teaspoon ground anise seed
2 tablespoons minced parsley
2 teaspoons ground coriander
Sheep casings


Combine all ingredients in a very large bowl. Next, grind the meat again with the seasonings. Use casings to make your desired sized sausages. Grill and serve hot!

Tuesday, July 7, 2009

Swirled Marble Rye Bread


As any 
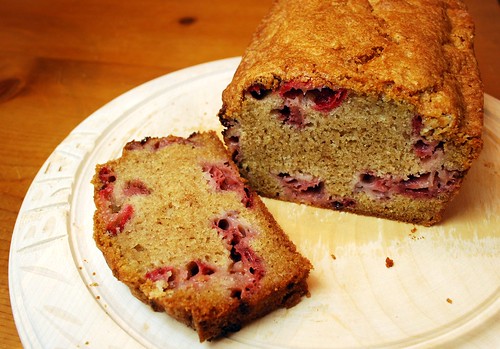
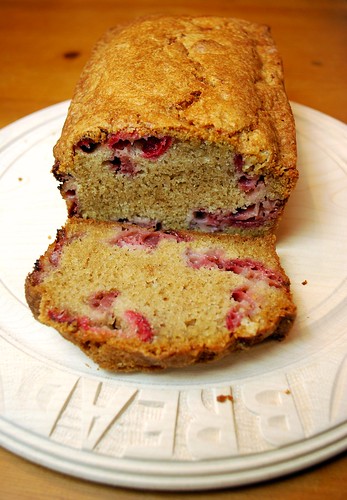
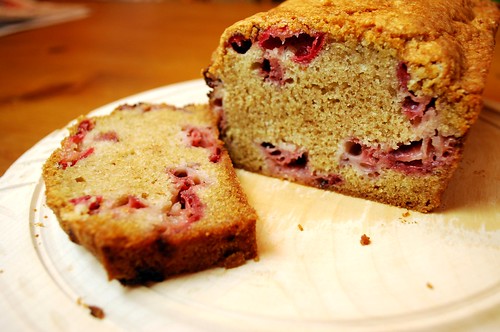
Seinfeld fan will tell you, a good loaf of marble rye bread is a hard thing to find - but a precious treat to enjoy if you're lucky enough to find one! This recipe is a keeper!!! It was very easy to make - I had so much fun swirling the doughs together. We made sandwiches with pimento cheese out of this as we lounged by the pool over the holiday weekend - hello! Delicious.

Marble Rye Bread
adapted from the Bread Baker's Apprentice

1 1/2 cups of white rye flour
3 cups unbleached bread flour
2 teaspoons salt
1 3/4 teaspoons instant yeast
1 tablespoon molasses
2 tablespoons shortening
1 1/4 cups water, at room temperature

1 1/2 cups white rye flour
3 cups unbleached bread flour
2 teaspoons salt
1 3/4 teaspoons instant yeast
1 tablespoon molasses
2 tablespoons shortening
1 1/4 cups water, at room temperature
3 tablespoons cocoa powder dissolved in 3 tablespoons of water

1 egg
1 teaspoon water

First, make the light rye. Stir together the rye, the bread flour, the salt, and the yeast. Add the molasses, shortening, and water. Mix until the dough forms a loose ball, adding an additional tablespoon of water or two if necessary to bring the dough together. Knead for 4-6 minutes, adding flour as necessary. The dough should feel supple and pliable but not sticky. Lightly oil a large bowl and transfer the dough to the bowl, rolling to coat it all over. Cover and set aside.

Next, make the dark rye. Stir together the rye, the bread flour, the salt, and the yeast. Add the molasses, shortening, water, and cocoa powder mixture. Mix until the dough forms a loose ball, adding an additional tablespoon of water or two if necessary to bring the dough together. Knead for 4-6 minutes, adding flour as necessary. The dough should feel supple and pliable but not sticky. Lightly oil a large bowl and transfer the dough to the bowl, rolling to coat it all over. Cover and set aside.

Ferment both doughs at room temperature for about 1 1/2 hours, or until they double in bulk.

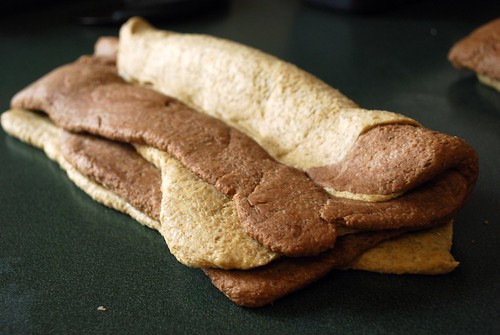
Next, turn each of the doughs out onto a lightly floured surface, and divide each color into 4 equal segments. For a spiral shape, take 2 pieces of light rye and 2 pieces of dark. Use a rolling pin to roll them out into rectangles approximately 8" by 5" in size. Layer the four rectangles so that the colors alternate, making sure that the light rye is on the bottom. Starting on the long side of the rectangle, fold about 1/3 of the dough towards you, pinching the dough down to form a seam like this:


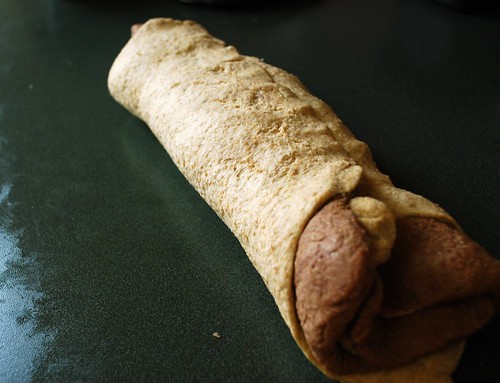
Next, take the other long edge of the rectangle, and fold it up and over the rolled-up dough, again pinching the edge to form a seam. The entire outside of the roll should be covered in the white rye, stretched around the inside layers.


Repeat this shaping process with the other 4 pieces of dough so that you have 2 loaves. You can place them on a large baking sheet lined with parchment or into well-oiled loaf 8x5" loaf pans like so.


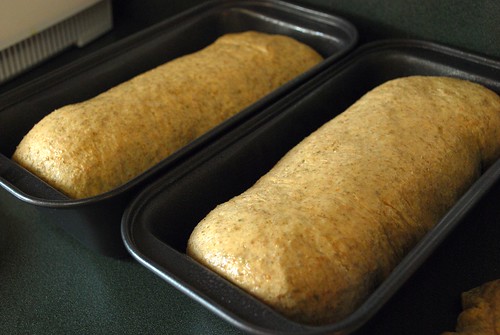
Mist the loaves with oil and cover with plastic wrap. Proof at room temperature for 60-90 minutes, or until the loaves double in bulk.

(Alternatively, you can refrigerate the dough for up to 2 days before proofing and baking.)

Preheat your oven to 350 degrees. In a small bowl, whisk the egg with the 1 teaspoon of water, and lightly brush the loaves with this egg wash. Bake on the middle rack for about 45 minutes, or until the internal temperature of the bread is 190 degrees (you can use a meat thermometer or a fancy bread thermometer for this). Remove immediately from the pans and cool on a rack for 1-2 hours before slicing or serving. Enjoy!!

Sunday, July 5, 2009

Key Lime Pie


As many of you may remember, the hubby and I took a trip to Jekyll Island a few weeks ago. While we were there, we enjoyed some delicious key lime pie - which got me thinking - why don't I make my own key lime pie? Can I even get key limes in the grocery store here in North Georgia?

Well, the answer is yes, I can! My dear father in law picked me up a bag of key limes from the grocery store last week and delivered them into my care on the condition that I make him a pie. I was glad to accept his offer!

The pie turned out beautifully - tart and creamy, complimented by a perfect graham crust and a generous dollop of freshly whipped cream. Perfection!

Key Lime Pie
adapted from epicurious.com

1 1/s cups graham cracker crumbs
2 tablespoons sugar
6 tablespoons butter, melted

1 14-ounce can of sweetened condensed milk
4 large egg yolks
2/3 cup Key lime juice
1 teaspoon key lime zest
1/2 teaspoon vanilla extract

1 cup chilled heavy whipping cream, whipped until soft peaks form

Preheat your oven to 350 degrees.

Combine the graham cracker crumbs and sugar in a medium bowl. Pour over the melted butter and stir until the mixture comes together in a rough ball. Press the mixture evenly into a 9" pie dish so that it lines the bottom and sides of the dish.

In a medium bowl, whisk together the sweetened condensed milk and the egg yolks until thoroughly combined. Add the lime juice, zest, and vanilla, and continue to whisk until the mixture thickens slightly. Pour the filling into your prepared pie shell.

Bake in the middle of your oven for 15 minutes. Cool the pie completely on a rack before covering it and putting it in the refrigerator to chill for at least 8 hours.

Serve chilled, and top each piece with the freshly whipped cream.


Friday, July 3, 2009

Another Blueberry Muffin Recipe


There is nothing better on a summer morning than freshly baked blueberry muffins made with perfectly ripe berries at the peak of their season. I'm taking advantage of this time of year to test out a few different muffin recipes so that I can pick out my favorite. It's so difficult with all the fun varieties out there to pick a favorite - these are tender and buttery, fluffy and moist on the inside with a nice crispy top - absolutely heavenly. But I also like my blueberry streusel muffins, too!! I think both recipes have earned a place in my muffin rotation!

Blueberry Muffins
adapted from the Secrets of Jesuit Breadmaking

1/2 cup butter-flavored shortening
3/4 cup sugar
2 eggs
2 cups all-purpose flour
1/2 teaspoon salt
2 teaspoons baking powder
2 1/2 cups fresh blueberries
1/2 cup whole milk
1 teaspoon vanilla extract

Preheat your oven to 375 degrees, and grease a 12-tin muffin pan.

Cream together the shortening and sugar until light and fluffy. Add the eggs, one at a time, blending completely.

In a separate bowl, whisk together the flour, salt, and baking powder. Measure the vanilla into the milk in a measuring cup. With your mixer on low speed, add the flour mixture and the milk mixture alternately to the batter, beginning and ending with the flour (because that's the way my momma taught me!). Mix just until blended, and then gently fold in the blueberries.

Divide the batter evenly in the muffin cups, filling them almost full. Bake for 25 minutes, until lightly golden brown. The muffins should spring back when you gently poke the tops with your fingertip. Cool in the tins for 10 minutes before removing them to a rack. Enjoy with a cup of coffee or Earl Grey tea!


Thursday, July 2, 2009

Sausage Stuffed Peppers


Here's another easy weeknight meal that I made up with some fresh and flavorful ingredients we had on hand. These peppers were bursting with flavor - but still quite lean because we used chicken sausage.

Sausage Stuffed Peppers

4 medium red or green bell peppers, cleaned and cored
2 italian sausages (we used sundried tomato chicken sausages)
1 tablespoon extra virgin olive oil
1/2 cup onion, diced
1 large clove of garlic, minced
1 medium tomato, diced
1/2 cup tomato sauce or marinara
2 cups cooked brown rice
1/4 cup freshly grated parmigiano reggiano
1 tablespoon freshly chopped basil
1 teaspoon freshly chopped oregano
Salt and pepper to taste
4 slices mozzarella cheese

Preheat your oven to 400 degrees. Grease a baking dish and set your cleaned and cored peppers inside of it. Use balls of tinfoil to prop them up if you have trouble making them sit correctly.

In a large pan over medium-high heat, brown the sausages. Remove them from the pan and slice 1/4" thick on the bias.

Add the olive oil to the pan, and add the onions, garlic, and tomato. Cook over medium-high heat for about 4-5 minutes, until the onions are tender and the tomato begins to break down. Add the sausage back to the pan, along with the sauce, the rice, the parmesan, and the herbs. Stir to combine and continue to cook until heated through. Adjust seasonings to taste with salt and pepper.

Fill the peppers with the sausage-and-rice mixture. Top with the mozzarella slices. Bake in your preheated oven for 15-20 minutes, until cheese is melted and peppers are slightly tender. Enjoy!


Made by Lena